


Hart Kallen
@hartkallen.bsky.social
Retired gent living on the Allegheny Plateau (SWPA).
Chatting with friends, keeping track of events, documenting my hobbies.
Chatting with friends, keeping track of events, documenting my hobbies.
#ufo_project
I have the lights working in the demo light program. The program from MS Co-Pilot didn’t turn on the external_power nor load the digitalio module. I figured out what the problem was and fixed the code.
I have the lights working in the demo light program. The program from MS Co-Pilot didn’t turn on the external_power nor load the digitalio module. I figured out what the problem was and fixed the code.
November 9, 2025 at 3:23 AM
#ufo_project
I have the lights working in the demo light program. The program from MS Co-Pilot didn’t turn on the external_power nor load the digitalio module. I figured out what the problem was and fixed the code.
I have the lights working in the demo light program. The program from MS Co-Pilot didn’t turn on the external_power nor load the digitalio module. I figured out what the problem was and fixed the code.
More parts for projects. On the left, 3.7V LIPO batteries, 150mAh and 105mAh. Adafruit.com On the right, hollow hexagonal box with spacer. Measured 4 inches vertex-to-vertex, 3-1/2 inches side-to-side, 1-1/8 inches tall with middle third spacer installed. For hiding electronics. Newtype.us


November 7, 2025 at 5:18 PM
More parts for projects. On the left, 3.7V LIPO batteries, 150mAh and 105mAh. Adafruit.com On the right, hollow hexagonal box with spacer. Measured 4 inches vertex-to-vertex, 3-1/2 inches side-to-side, 1-1/8 inches tall with middle third spacer installed. For hiding electronics. Newtype.us
#project_ufo
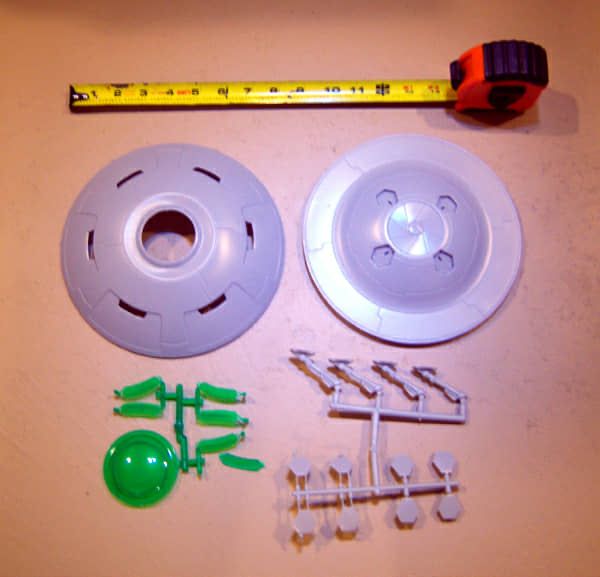
Some parts came in. I plan on cutting a hole in the iris on the bottom of the UFO model, and adding a speaker grill. On the inside, I plan on placing a speaker to emit an ambient UFO hum.
Some parts came in. I plan on cutting a hole in the iris on the bottom of the UFO model, and adding a speaker grill. On the inside, I plan on placing a speaker to emit an ambient UFO hum.


November 6, 2025 at 2:55 PM
#project_ufo
Some parts came in. I plan on cutting a hole in the iris on the bottom of the UFO model, and adding a speaker grill. On the inside, I plan on placing a speaker to emit an ambient UFO hum.
Some parts came in. I plan on cutting a hole in the iris on the bottom of the UFO model, and adding a speaker grill. On the inside, I plan on placing a speaker to emit an ambient UFO hum.
Directions to build the UFO model showing top and side views of completed model.

October 26, 2025 at 12:40 AM
Directions to build the UFO model showing top and side views of completed model.
#project_ufo
We sat down and brain stormed some of the design. We decided to add a mid layer to support effects hardware. An Adafruit RP 2040 Propmaker Feather, a LiPo battery, a speaker will mount to the bottom of the plate. A Neopixel ring will mount to the top and illuminate the windows and dome.
We sat down and brain stormed some of the design. We decided to add a mid layer to support effects hardware. An Adafruit RP 2040 Propmaker Feather, a LiPo battery, a speaker will mount to the bottom of the plate. A Neopixel ring will mount to the top and illuminate the windows and dome.


October 25, 2025 at 11:29 PM
#project_ufo
We sat down and brain stormed some of the design. We decided to add a mid layer to support effects hardware. An Adafruit RP 2040 Propmaker Feather, a LiPo battery, a speaker will mount to the bottom of the plate. A Neopixel ring will mount to the top and illuminate the windows and dome.
We sat down and brain stormed some of the design. We decided to add a mid layer to support effects hardware. An Adafruit RP 2040 Propmaker Feather, a LiPo battery, a speaker will mount to the bottom of the plate. A Neopixel ring will mount to the top and illuminate the windows and dome.
This is the Armored Special Carrier (ASC). It’s a mecha carrier. I’m hoping to add simple lighting.

October 20, 2025 at 1:37 AM
This is the Armored Special Carrier (ASC). It’s a mecha carrier. I’m hoping to add simple lighting.
This is what the UFO Kit will look like. I’m thinking a downward firing speaker, a polystyrene middle layer for electronics, an Adafruit RP2040 Propmaker Feather, and Neopixels to light the dome.
October 17, 2025 at 5:24 PM
This is what the UFO Kit will look like. I’m thinking a downward firing speaker, a polystyrene middle layer for electronics, an Adafruit RP2040 Propmaker Feather, and Neopixels to light the dome.
With everything taking longer than expected, I decided to snap together at V-33 Stork VTOL from the Japanese anime "Warrior at the Borderline". No paint. No glue. No stickers.
I may glue it together and paint it later.
This would be my first completed model.
I may glue it together and paint it later.
This would be my first completed model.

October 9, 2025 at 2:55 AM
With everything taking longer than expected, I decided to snap together at V-33 Stork VTOL from the Japanese anime "Warrior at the Borderline". No paint. No glue. No stickers.
I may glue it together and paint it later.
This would be my first completed model.
I may glue it together and paint it later.
This would be my first completed model.
#defiant
The algorithm is watching. My browser sent me over to eBay, to see a lighting kit for a 1:1000 scale Defiant. The price was $39.95.
The pictures were taken in the dark with over-exposed shots showing the Main Deflector, Bussard Collectors, and Warp Grills.
The algorithm is watching. My browser sent me over to eBay, to see a lighting kit for a 1:1000 scale Defiant. The price was $39.95.
The pictures were taken in the dark with over-exposed shots showing the Main Deflector, Bussard Collectors, and Warp Grills.


October 5, 2025 at 4:11 AM
#defiant
The algorithm is watching. My browser sent me over to eBay, to see a lighting kit for a 1:1000 scale Defiant. The price was $39.95.
The pictures were taken in the dark with over-exposed shots showing the Main Deflector, Bussard Collectors, and Warp Grills.
The algorithm is watching. My browser sent me over to eBay, to see a lighting kit for a 1:1000 scale Defiant. The price was $39.95.
The pictures were taken in the dark with over-exposed shots showing the Main Deflector, Bussard Collectors, and Warp Grills.
#jester_class
I have a lot of work to do.
I have a lot of work to do.
September 26, 2025 at 10:19 PM
#jester_class
I have a lot of work to do.
I have a lot of work to do.
Sealing batteries into the #defiant would not be a good idea. What if we added a hole to the underside of the model and pressed a magnetic USB-C plug tip into it. That tip would socket into a USB-C Breakout. We have connectors for voltage and data.


September 26, 2025 at 3:15 PM
Sealing batteries into the #defiant would not be a good idea. What if we added a hole to the underside of the model and pressed a magnetic USB-C plug tip into it. That tip would socket into a USB-C Breakout. We have connectors for voltage and data.
#defiant
Started work on the 1:1000 Defiant model. Painting insides with flat black primer for light blocking. Added hole on ventral side for magnetic USB-C port to deliver power and maybe data.
Started work on the 1:1000 Defiant model. Painting insides with flat black primer for light blocking. Added hole on ventral side for magnetic USB-C port to deliver power and maybe data.

September 26, 2025 at 2:03 AM
#defiant
Started work on the 1:1000 Defiant model. Painting insides with flat black primer for light blocking. Added hole on ventral side for magnetic USB-C port to deliver power and maybe data.
Started work on the 1:1000 Defiant model. Painting insides with flat black primer for light blocking. Added hole on ventral side for magnetic USB-C port to deliver power and maybe data.
#defiant
Had an interesting idea regarding wiring lights into the nacelles of a 1:1000 Defiant. Mount the lights to the outside of the Primary Hull.
Had an interesting idea regarding wiring lights into the nacelles of a 1:1000 Defiant. Mount the lights to the outside of the Primary Hull.


September 7, 2025 at 6:41 PM
#defiant
Had an interesting idea regarding wiring lights into the nacelles of a 1:1000 Defiant. Mount the lights to the outside of the Primary Hull.
Had an interesting idea regarding wiring lights into the nacelles of a 1:1000 Defiant. Mount the lights to the outside of the Primary Hull.


Addendum 3
LED filaments - 25mm. Red and blue. Intended to light warp nacelles.
LED filaments - 25mm. Red and blue. Intended to light warp nacelles.

August 26, 2025 at 10:29 AM
Addendum 3
LED filaments - 25mm. Red and blue. Intended to light warp nacelles.
LED filaments - 25mm. Red and blue. Intended to light warp nacelles.
Addendum 2
Z sized LEDS (left), Pico LEDs (right)
Z sized LEDS (left), Pico LEDs (right)

August 26, 2025 at 10:20 AM
Addendum 2
Z sized LEDS (left), Pico LEDs (right)
Z sized LEDS (left), Pico LEDs (right)
Addendum
To give you an idea of how tiny Pico and Z size LEDs are, I’m enclosing a picture of EvanDesigns business card-sized guide.
To give you an idea of how tiny Pico and Z size LEDs are, I’m enclosing a picture of EvanDesigns business card-sized guide.

August 26, 2025 at 3:48 AM
Addendum
To give you an idea of how tiny Pico and Z size LEDs are, I’m enclosing a picture of EvanDesigns business card-sized guide.
To give you an idea of how tiny Pico and Z size LEDs are, I’m enclosing a picture of EvanDesigns business card-sized guide.

Test of 25mm blue nood. Adafruit 6143. Same conditions.

July 29, 2025 at 12:48 AM
Test of 25mm blue nood. Adafruit 6143. Same conditions.

#my_hobby
It worked. As advertised. 3.3V supply. 100 ohm current limiting resistor. This backlight is for a test to see if this light could be used to light the windows in the primary hull (saucer section) of a model starship.
It worked. As advertised. 3.3V supply. 100 ohm current limiting resistor. This backlight is for a test to see if this light could be used to light the windows in the primary hull (saucer section) of a model starship.

July 29, 2025 at 12:16 AM
#my_hobby
It worked. As advertised. 3.3V supply. 100 ohm current limiting resistor. This backlight is for a test to see if this light could be used to light the windows in the primary hull (saucer section) of a model starship.
It worked. As advertised. 3.3V supply. 100 ohm current limiting resistor. This backlight is for a test to see if this light could be used to light the windows in the primary hull (saucer section) of a model starship.


Scale model lighting effects seen at Wonderfest USA.


June 10, 2025 at 6:53 PM
Scale model lighting effects seen at Wonderfest USA.
There are two. I suspect siblings.


June 9, 2025 at 8:20 PM
There are two. I suspect siblings.
3/ #my_hobby
What am I building? A Jester-class (Oberth-class variant) Starship. The underslung sensor pod is replaced with an underslung photon torpedo pod.
The M0 Express and the first TLS59711 fit in the primary hull, with a second TLS59711 in the secondary.
Image: DeviantArt
What am I building? A Jester-class (Oberth-class variant) Starship. The underslung sensor pod is replaced with an underslung photon torpedo pod.
The M0 Express and the first TLS59711 fit in the primary hull, with a second TLS59711 in the secondary.
Image: DeviantArt

May 18, 2025 at 11:33 PM
3/ #my_hobby
What am I building? A Jester-class (Oberth-class variant) Starship. The underslung sensor pod is replaced with an underslung photon torpedo pod.
The M0 Express and the first TLS59711 fit in the primary hull, with a second TLS59711 in the secondary.
Image: DeviantArt
What am I building? A Jester-class (Oberth-class variant) Starship. The underslung sensor pod is replaced with an underslung photon torpedo pod.
The M0 Express and the first TLS59711 fit in the primary hull, with a second TLS59711 in the secondary.
Image: DeviantArt