


November 28, 2025 at 2:05 PM
Reposted by randers


Reposted by randers


Reposted by randers


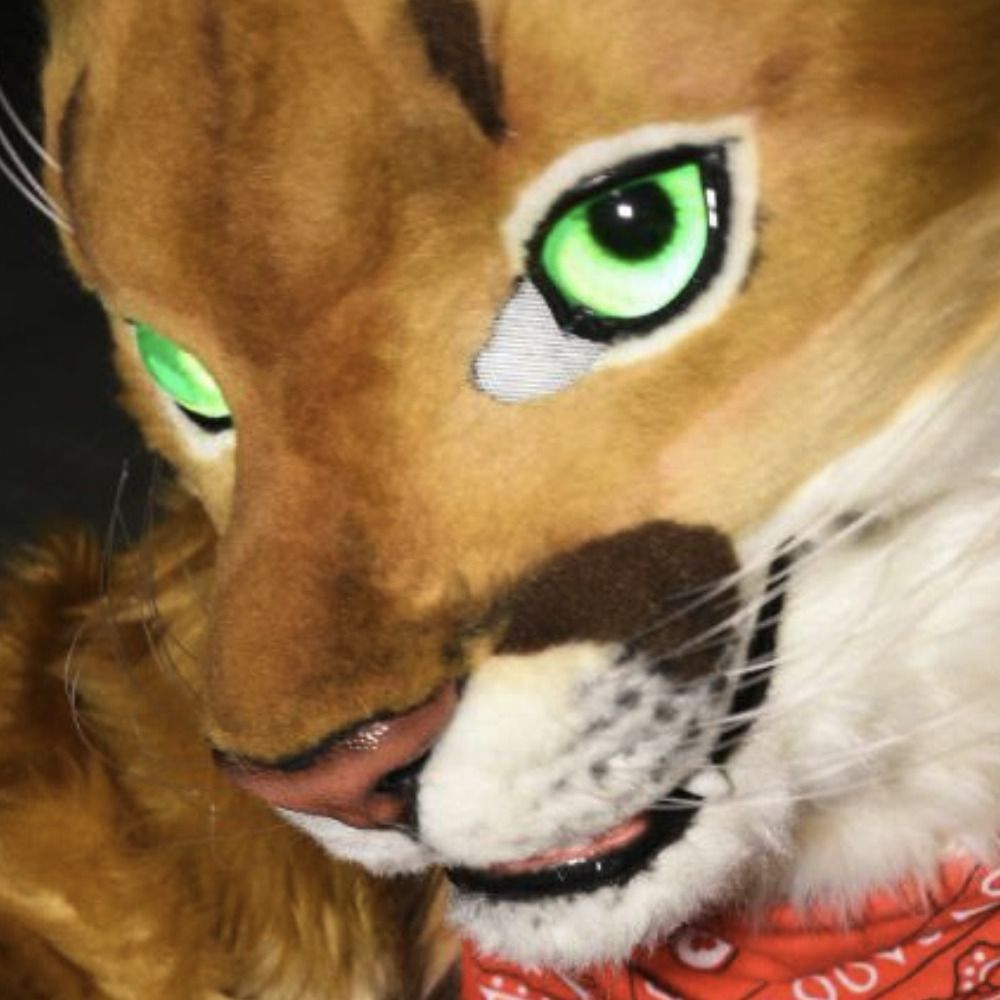
Happy #FursuitFriday :)
featuring a spoopy side character oooo
🪡 @equinoxkitty.bsky.social
📷 @schtewee.bsky.social
featuring a spoopy side character oooo
🪡 @equinoxkitty.bsky.social
📷 @schtewee.bsky.social

November 21, 2025 at 4:22 PM
Happy #FursuitFriday :)
featuring a spoopy side character oooo
🪡 @equinoxkitty.bsky.social
📷 @schtewee.bsky.social
featuring a spoopy side character oooo
🪡 @equinoxkitty.bsky.social
📷 @schtewee.bsky.social
Reposted by randers


Reposted by randers


Reposted by randers


Reposted by randers

November 14, 2025 at 10:13 PM

November 7, 2025 at 7:09 PM
Reposted by randers


October 31, 2025 at 9:05 PM
Remember the sunny days of summer? I do 🥺 and I already miss them.
Happy #FursuitFriday!
🪡 @equinoxkitty.bsky.social (check her out, commissions open right now!! 👀)
📷 @mabsfloof.bsky.social
#Fursuit
Happy #FursuitFriday!
🪡 @equinoxkitty.bsky.social (check her out, commissions open right now!! 👀)
📷 @mabsfloof.bsky.social
#Fursuit

October 31, 2025 at 8:57 PM
Remember the sunny days of summer? I do 🥺 and I already miss them.
Happy #FursuitFriday!
🪡 @equinoxkitty.bsky.social (check her out, commissions open right now!! 👀)
📷 @mabsfloof.bsky.social
#Fursuit
Happy #FursuitFriday!
🪡 @equinoxkitty.bsky.social (check her out, commissions open right now!! 👀)
📷 @mabsfloof.bsky.social
#Fursuit
Made a version 2 of my fan hardware. The fact that I was relying on a powerbank to keep giving me 12 volts was a never ending source of problems. This one in particular just wouldnt stay on 12V for longer than 10 minutes no matter what I tried.
So this version gets 5V and boosts it to 12V.
So this version gets 5V and boosts it to 12V.

October 26, 2025 at 10:31 AM
Made a version 2 of my fan hardware. The fact that I was relying on a powerbank to keep giving me 12 volts was a never ending source of problems. This one in particular just wouldnt stay on 12V for longer than 10 minutes no matter what I tried.
So this version gets 5V and boosts it to 12V.
So this version gets 5V and boosts it to 12V.

Reposted by randers


Reposted by randers

Peaches getting in the spirit!

October 21, 2025 at 5:55 PM
Peaches getting in the spirit!
Reposted by randers


October 17, 2025 at 9:31 PM

October 10, 2025 at 12:50 PM
I hate it when stores have stuff in my fursona colors. anyways I now own 3 spare dish brushes…

October 7, 2025 at 7:05 PM
I hate it when stores have stuff in my fursona colors. anyways I now own 3 spare dish brushes…
Blep in the spotlight 👅 👉👈
🪡 @equinoxkitty.bsky.social
📷 @mabsfloof.bsky.social
#Fursuit #FursuitFriday
🪡 @equinoxkitty.bsky.social
📷 @mabsfloof.bsky.social
#Fursuit #FursuitFriday

October 3, 2025 at 6:15 PM
Blep in the spotlight 👅 👉👈
🪡 @equinoxkitty.bsky.social
📷 @mabsfloof.bsky.social
#Fursuit #FursuitFriday
🪡 @equinoxkitty.bsky.social
📷 @mabsfloof.bsky.social
#Fursuit #FursuitFriday
What‘s cooler than fursuiting? Doing it while staying cool yourself :)
I made this mod for my fursuit to add a fan, which is:
- variable speed, quickly selectable
- powered by USB Type C
- quite compact
I did a bunch of design work on the controller for this, so I wanted to share! (Thread)
I made this mod for my fursuit to add a fan, which is:
- variable speed, quickly selectable
- powered by USB Type C
- quite compact
I did a bunch of design work on the controller for this, so I wanted to share! (Thread)


September 28, 2025 at 3:19 PM
What‘s cooler than fursuiting? Doing it while staying cool yourself :)
I made this mod for my fursuit to add a fan, which is:
- variable speed, quickly selectable
- powered by USB Type C
- quite compact
I did a bunch of design work on the controller for this, so I wanted to share! (Thread)
I made this mod for my fursuit to add a fan, which is:
- variable speed, quickly selectable
- powered by USB Type C
- quite compact
I did a bunch of design work on the controller for this, so I wanted to share! (Thread)
All my homies love trams 💯
Historical tram in Malmö 🇸🇪 (www.mss.se)
📷 @mabsfloof.bsky.social
🪡 @equinoxkitty.bsky.social
#Fursuit #FursuitFriday
Historical tram in Malmö 🇸🇪 (www.mss.se)
📷 @mabsfloof.bsky.social
🪡 @equinoxkitty.bsky.social
#Fursuit #FursuitFriday

September 26, 2025 at 8:26 AM
All my homies love trams 💯
Historical tram in Malmö 🇸🇪 (www.mss.se)
📷 @mabsfloof.bsky.social
🪡 @equinoxkitty.bsky.social
#Fursuit #FursuitFriday
Historical tram in Malmö 🇸🇪 (www.mss.se)
📷 @mabsfloof.bsky.social
🪡 @equinoxkitty.bsky.social
#Fursuit #FursuitFriday
that’s kinda SUSSY ඞ 📮
📷 @mabsfloof.bsky.social
🪡 @equinoxkitty.bsky.social
#Fursuit #FursuitEveryday
📷 @mabsfloof.bsky.social
🪡 @equinoxkitty.bsky.social
#Fursuit #FursuitEveryday

September 22, 2025 at 11:23 PM
that’s kinda SUSSY ඞ 📮
📷 @mabsfloof.bsky.social
🪡 @equinoxkitty.bsky.social
#Fursuit #FursuitEveryday
📷 @mabsfloof.bsky.social
🪡 @equinoxkitty.bsky.social
#Fursuit #FursuitEveryday