


Lost_Proxy[Orc]
@lostproxyorc.bsky.social
NSFW/🔞 | 3d artist and animator | Size diff n' Macro/Micro stuff | Humans small, Monster-Men BIG | Orcs, horns and tusks
Links: lostproxyorc.carrd.co
Patreon: patreon.com/LostProxyOrc
SubscribeStar: subscribestar.adult/lost-proxy-orc
Links: lostproxyorc.carrd.co
Patreon: patreon.com/LostProxyOrc
SubscribeStar: subscribestar.adult/lost-proxy-orc
More pics of the ol' gargoyle lad. I was pretty proud of that lantern tail, but I didn't know enough about Blender to actual put a following flame inside it at the time.


December 8, 2025 at 3:34 AM
More pics of the ol' gargoyle lad. I was pretty proud of that lantern tail, but I didn't know enough about Blender to actual put a following flame inside it at the time.
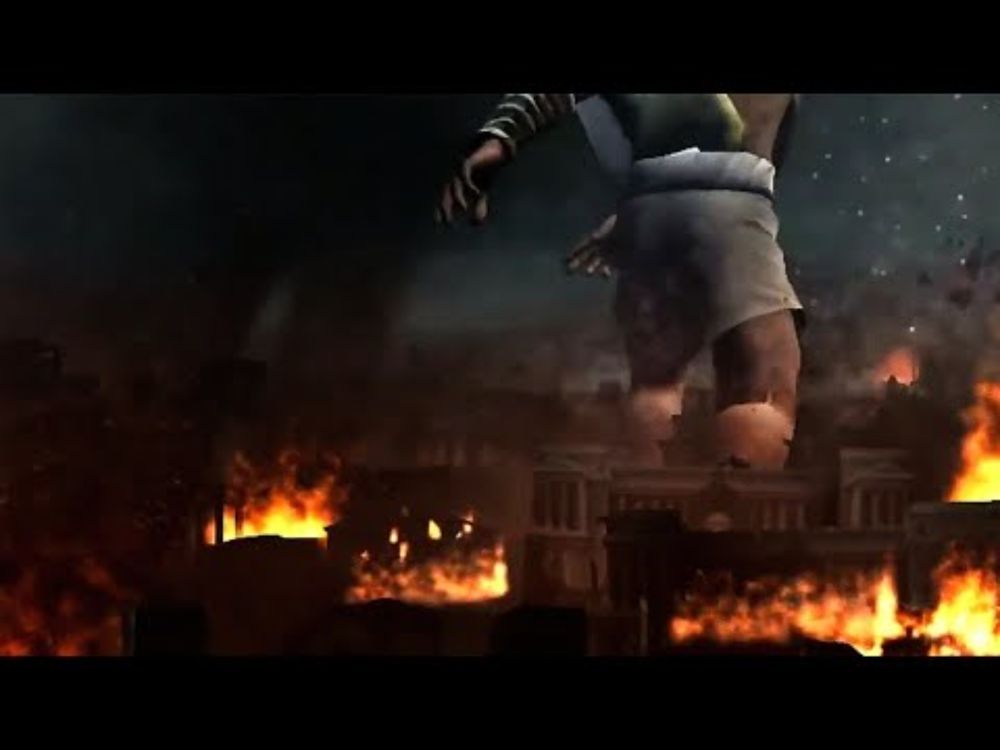
Got living statues on the brain now:


December 8, 2025 at 3:29 AM
Got living statues on the brain now:
Reposted by Lost_Proxy[Orc]

Celebrating this occasion with some happy hippos !!!

December 8, 2025 at 2:31 AM
Celebrating this occasion with some happy hippos !!!
All the games had their macro moments but I feel like 2 really squeezed in the most, banger after banger:
Zeus Destroys Sparta - God Of War 2 [HD]
YouTube video by mlxiixlm
youtu.be
December 7, 2025 at 9:26 PM
All the games had their macro moments but I feel like 2 really squeezed in the most, banger after banger:
First was probably the living statue from Jason and the Argonauts, but the *actual* pivotal moment is just all of GoW2:


December 7, 2025 at 9:06 PM
First was probably the living statue from Jason and the Argonauts, but the *actual* pivotal moment is just all of GoW2:
That roof comes right off (wip)

December 1, 2025 at 12:32 AM
That roof comes right off (wip)
Finished with working on physic sim stuff for building #2 so now onto sim'ing the last remaining key building for this shot


November 24, 2025 at 6:41 PM
Finished with working on physic sim stuff for building #2 so now onto sim'ing the last remaining key building for this shot
Reposted by Lost_Proxy[Orc]

Oh it’s that time again.

a picture of a man in a suit and tie with the words cloudflare outage above him
ALT: a picture of a man in a suit and tie with the words cloudflare outage above him
media.tenor.com
November 18, 2025 at 12:47 PM
Oh it’s that time again.
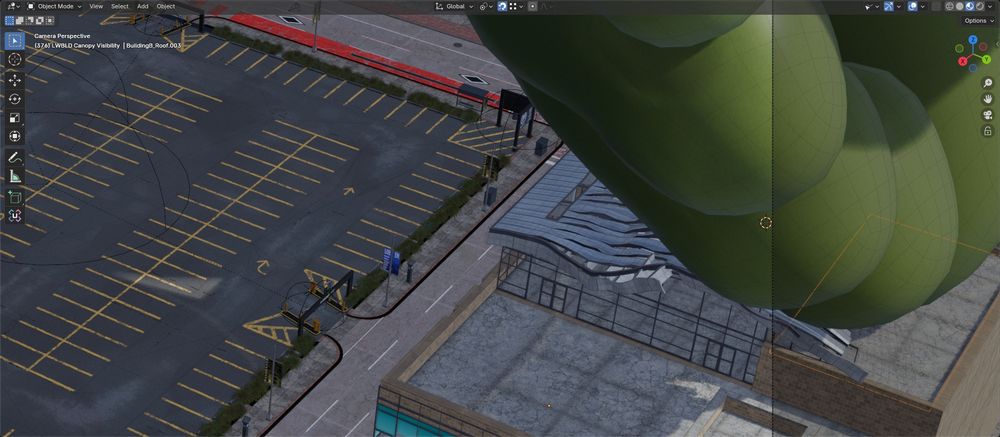
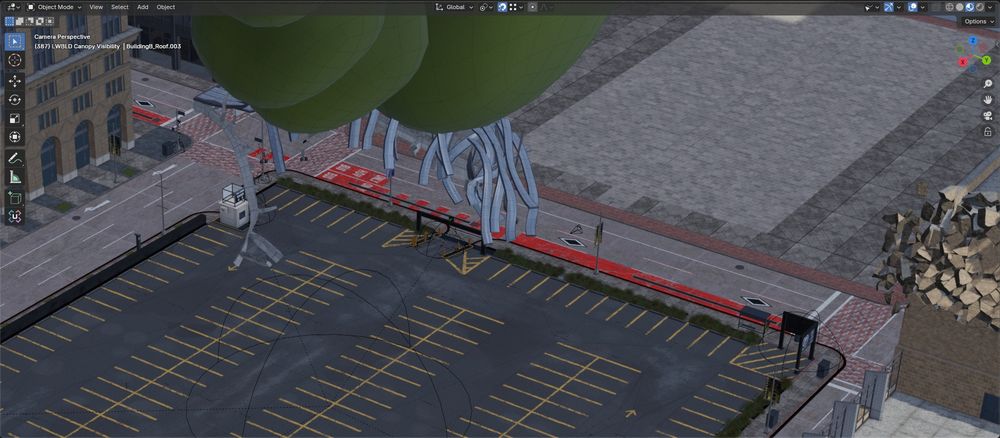
Making decent progress on building #2 now, along with the vehicles outside it (WIP).
Still gotta do sims for windows + glass, interiors and bits of these vehicles too. Also lattice/deform stuff for the trees + leaves.
Then I can move onto working on the last building for this shot.
Still gotta do sims for windows + glass, interiors and bits of these vehicles too. Also lattice/deform stuff for the trees + leaves.
Then I can move onto working on the last building for this shot.


November 17, 2025 at 2:54 AM
Making decent progress on building #2 now, along with the vehicles outside it (WIP).
Still gotta do sims for windows + glass, interiors and bits of these vehicles too. Also lattice/deform stuff for the trees + leaves.
Then I can move onto working on the last building for this shot.
Still gotta do sims for windows + glass, interiors and bits of these vehicles too. Also lattice/deform stuff for the trees + leaves.
Then I can move onto working on the last building for this shot.
Reposted by Lost_Proxy[Orc]

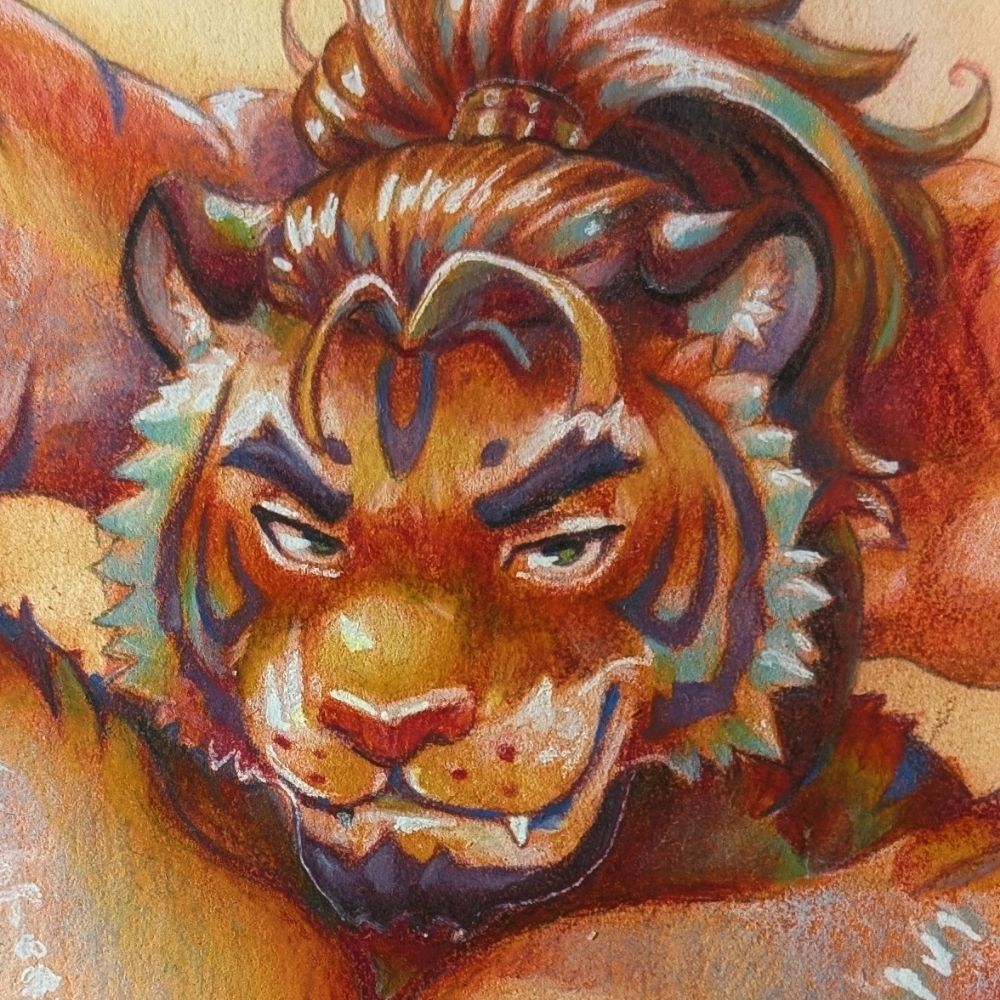
All you could hear backstage was Orcish grunts and groans until a loud, echoing "FFFFFFFFFFUUUUUUUUUUUUUUUUUUUUUUUUUUUUUUUUCCCCCCCCCKKKKKKKKKKKKK" echoed out.
Poor Boz couldn't even last 3 days into NNN without going near feral..
Incredible piece by @komboochie.bsky.social <3333
Poor Boz couldn't even last 3 days into NNN without going near feral..
Incredible piece by @komboochie.bsky.social <3333

November 3, 2025 at 10:31 AM
All you could hear backstage was Orcish grunts and groans until a loud, echoing "FFFFFFFFFFUUUUUUUUUUUUUUUUUUUUUUUUUUUUUUUUCCCCCCCCCKKKKKKKKKKKKK" echoed out.
Poor Boz couldn't even last 3 days into NNN without going near feral..
Incredible piece by @komboochie.bsky.social <3333
Poor Boz couldn't even last 3 days into NNN without going near feral..
Incredible piece by @komboochie.bsky.social <3333
Rounded out this month with another set of shots animated, now only 5 left to get to for this one. Then shot corrections + non-animation related stuff.
For now though I'm hopping back over to work on that parking stomping animation some more.
For now though I'm hopping back over to work on that parking stomping animation some more.

October 30, 2025 at 8:40 PM
Rounded out this month with another set of shots animated, now only 5 left to get to for this one. Then shot corrections + non-animation related stuff.
For now though I'm hopping back over to work on that parking stomping animation some more.
For now though I'm hopping back over to work on that parking stomping animation some more.
This month was kinda rough in terms of actually getting stuff done.
Would've liked to have made a start on some of those shot corrections but the last week of Oct is here now, so will focus on finishing up this last shot for this update.
Would've liked to have made a start on some of those shot corrections but the last week of Oct is here now, so will focus on finishing up this last shot for this update.
October 27, 2025 at 12:03 AM
This month was kinda rough in terms of actually getting stuff done.
Would've liked to have made a start on some of those shot corrections but the last week of Oct is here now, so will focus on finishing up this last shot for this update.
Would've liked to have made a start on some of those shot corrections but the last week of Oct is here now, so will focus on finishing up this last shot for this update.
I will *always* hand-animate the cock and balls and you can't stop me :3c

October 26, 2025 at 7:37 PM
I will *always* hand-animate the cock and balls and you can't stop me :3c
Working on a new climax shot for the Lug animation atm: bouncin' on it (getting repeated full-body slammed to climax beneath a giant orc's toe).

October 19, 2025 at 2:32 AM
Working on a new climax shot for the Lug animation atm: bouncin' on it (getting repeated full-body slammed to climax beneath a giant orc's toe).
future devil chest vore
October 19, 2025 at 12:46 AM
future devil chest vore
Reposted by Lost_Proxy[Orc]

gettin those arms moving right! these are some basic shape keys, nothin fancy happening yet
October 6, 2025 at 9:17 AM
gettin those arms moving right! these are some basic shape keys, nothin fancy happening yet
Reposted by Lost_Proxy[Orc]


Reposted by Lost_Proxy[Orc]

Reposted by Lost_Proxy[Orc]


A lil extra for #orctober to go with a repost: a comparison I posted on FA a bit back between part of the final animation and the old SFM wip that inspired it:
October 1, 2025 at 1:54 PM
A lil extra for #orctober to go with a repost: a comparison I posted on FA a bit back between part of the final animation and the old SFM wip that inspired it:
So, I think I've figured this out now :d

September 26, 2025 at 7:47 PM
So, I think I've figured this out now :d
Having a go at making the height map semi-procedural to cut down on the amount of stencilling + hand-painting required (still going to require baking to image and some painting over I think).

September 26, 2025 at 4:18 AM
Having a go at making the height map semi-procedural to cut down on the amount of stencilling + hand-painting required (still going to require baking to image and some painting over I think).
Was hoping to get some more destruction stuff done this week but ended up rounding it out doing vehicle related things instead, including getting a basic geo-node setup for traffic working (each car is a separate mesh plane with instances controlled by geo-nodes):
September 22, 2025 at 2:01 AM
Was hoping to get some more destruction stuff done this week but ended up rounding it out doing vehicle related things instead, including getting a basic geo-node setup for traffic working (each car is a separate mesh plane with instances controlled by geo-nodes):
Reposted by Lost_Proxy[Orc]

Reposted by Lost_Proxy[Orc]

September 19, 2025 at 2:19 PM