


Igor Freiberger
@igorfreiberger.bsky.social
Independent type designer with focus on high quality typography for minority languages. FontLab team. Fonts with full Latin, Cyrillic, Greek, Armenian, and Georgian scripts, plus phonetics and symbols.
Porto Alegre, Brazil
Porto Alegre, Brazil
Pre-release version of Laboratorium is pictured in Typography News No. 23, by @jectives.com.

Chapters have been added to yesterdays livestream of Typography News No. 23 👀
Includes type designs by @igorfreiberger.bsky.social, @nicksherman.bsky.social, Brandon Nickerson, Fontfabric, The Designers Foundry, TypeType, Teo Tuomiminen, along with news about Affinity, Adobe, & FontLab
Includes type designs by @igorfreiberger.bsky.social, @nicksherman.bsky.social, Brandon Nickerson, Fontfabric, The Designers Foundry, TypeType, Teo Tuomiminen, along with news about Affinity, Adobe, & FontLab

Typography News No. 23
YouTube video by Jectives
youtube.com
November 4, 2025 at 6:49 AM
Pre-release version of Laboratorium is pictured in Typography News No. 23, by @jectives.com.
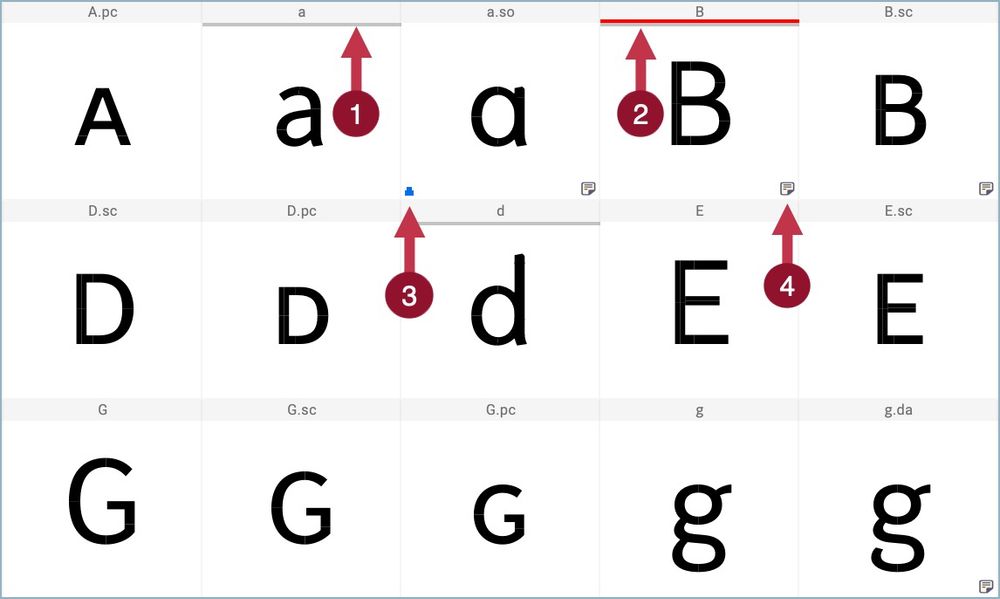
Laboratorium samples with small caps and old style numbers. English, French, German, Vietnamese, Spanish, and Esperanto.


August 17, 2025 at 6:17 AM
Laboratorium samples with small caps and old style numbers. English, French, German, Vietnamese, Spanish, and Esperanto.
More samples of Laboratorium —now using Hungarian, Czech, and Portuguese, all with Old Style figures.


August 13, 2025 at 1:12 AM
More samples of Laboratorium —now using Hungarian, Czech, and Portuguese, all with Old Style figures.
FontLab 8 Tip: Stems
In File > Font Info you can define stems for each master automatically (1). A stem is a repeating value for vertical (2), horizontal (3), and diagonal stems (4). It can also be a value for distance in the apex of a curve (5).
In File > Font Info you can define stems for each master automatically (1). A stem is a repeating value for vertical (2), horizontal (3), and diagonal stems (4). It can also be a value for distance in the apex of a curve (5).


August 12, 2025 at 5:33 AM
FontLab 8 Tip: Stems
In File > Font Info you can define stems for each master automatically (1). A stem is a repeating value for vertical (2), horizontal (3), and diagonal stems (4). It can also be a value for distance in the apex of a curve (5).
In File > Font Info you can define stems for each master automatically (1). A stem is a repeating value for vertical (2), horizontal (3), and diagonal stems (4). It can also be a value for distance in the apex of a curve (5).
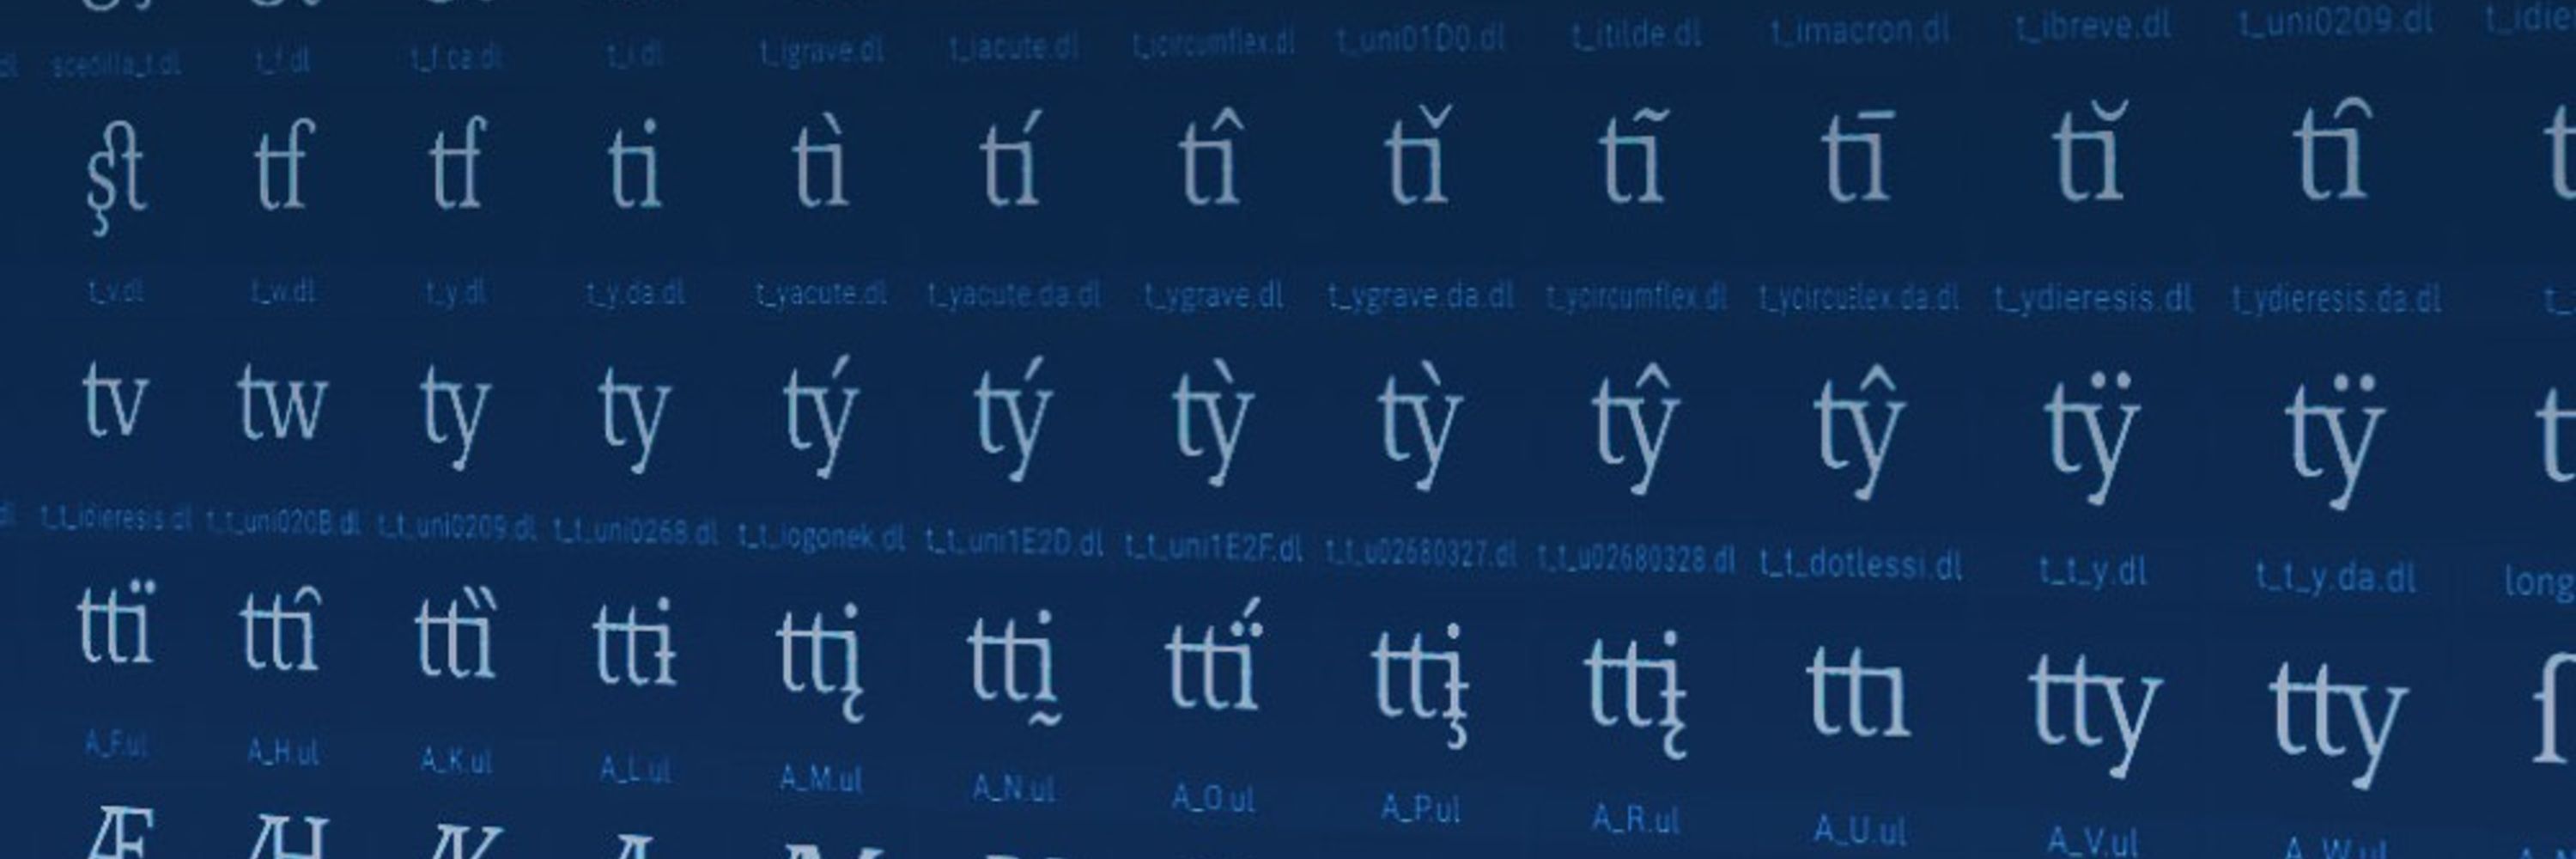
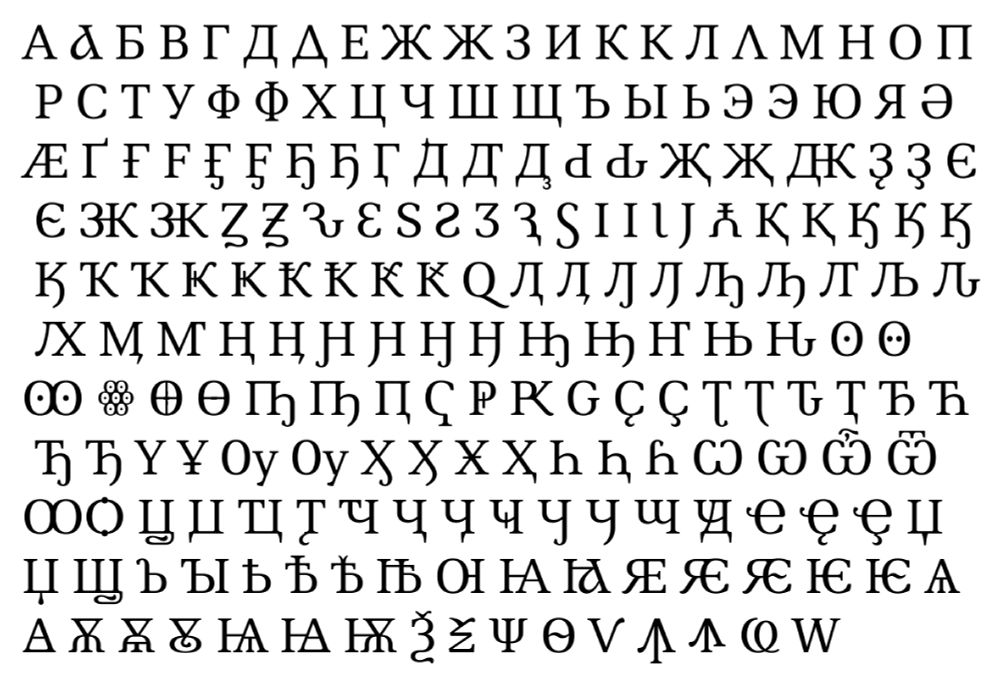
More samples of Laboratorium —now in Italian, Dutch, Russian, and Polish. The second column of Russian shows how Cyrillic, Latin, and Greek scripts work together.


August 12, 2025 at 3:11 AM
More samples of Laboratorium —now in Italian, Dutch, Russian, and Polish. The second column of Russian shows how Cyrillic, Latin, and Greek scripts work together.
Laboratorium samples in English, French, German, and Spanish.


August 10, 2025 at 10:43 AM
Laboratorium samples in English, French, German, and Spanish.
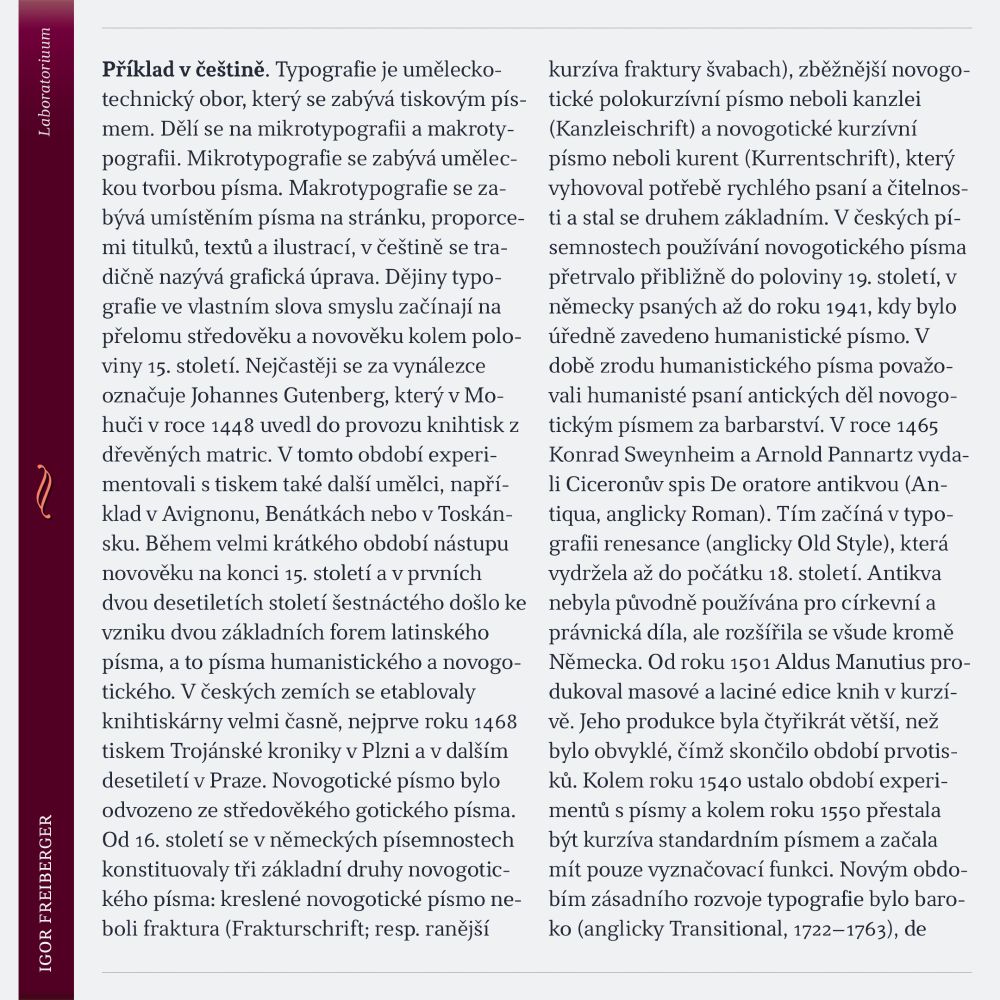
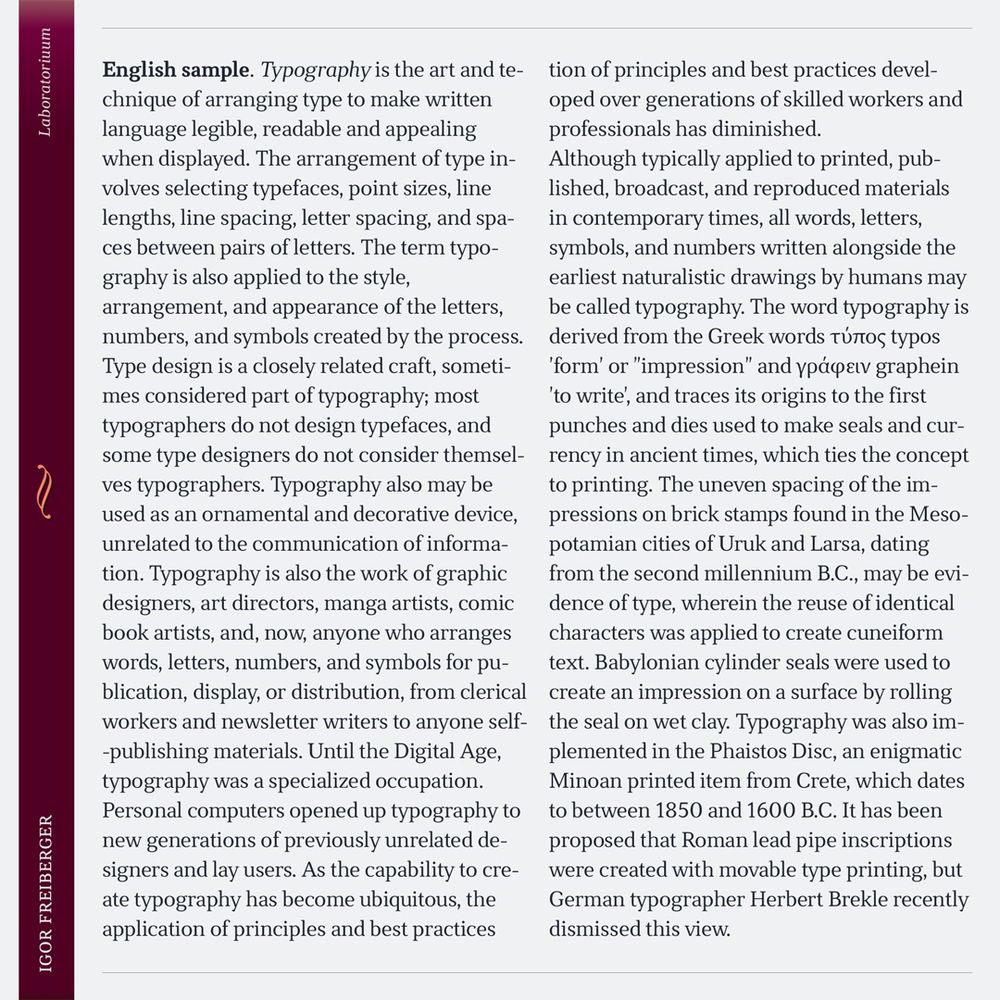
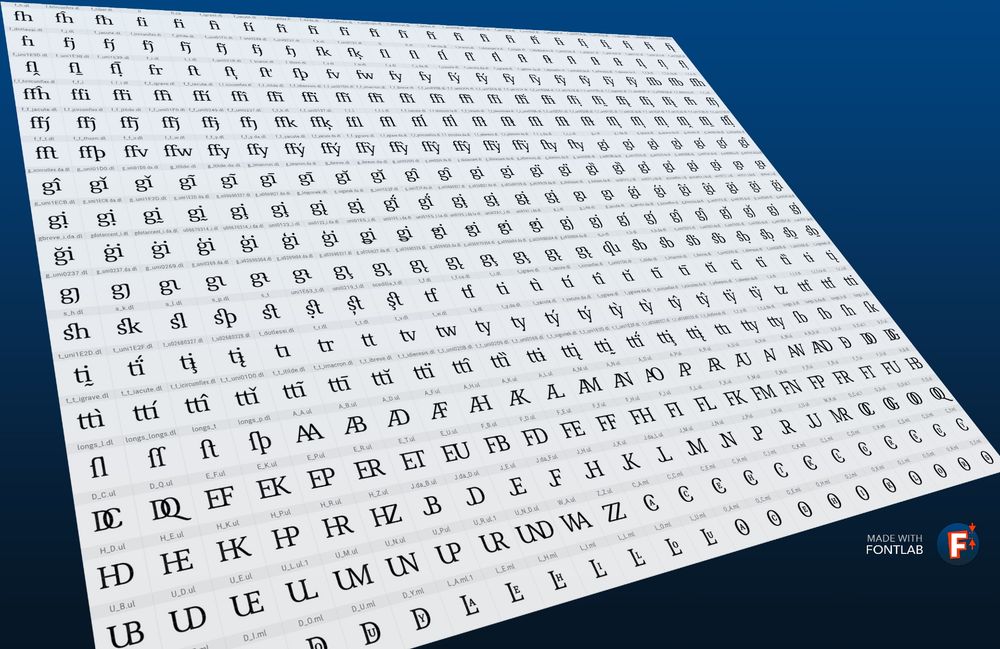
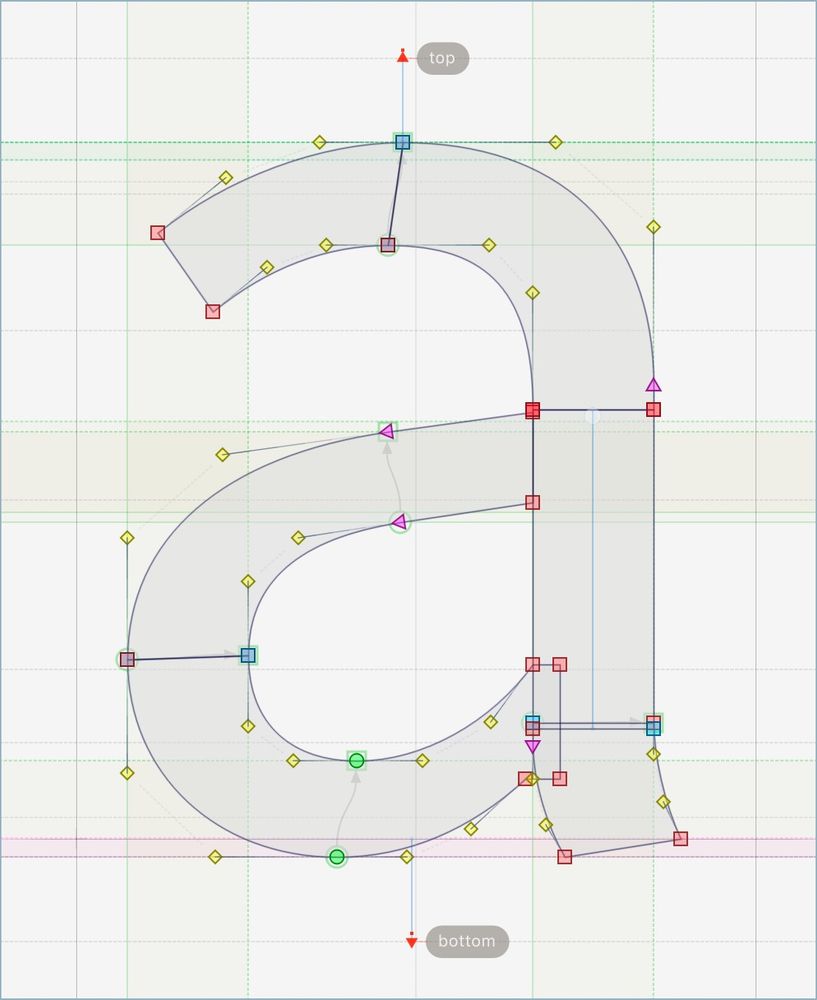
Laboratorium, a serif type family for texts, is coming. Samples with Latin repertoire, weights, symbols, and random words.


August 10, 2025 at 1:40 AM
Laboratorium, a serif type family for texts, is coming. Samples with Latin repertoire, weights, symbols, and random words.
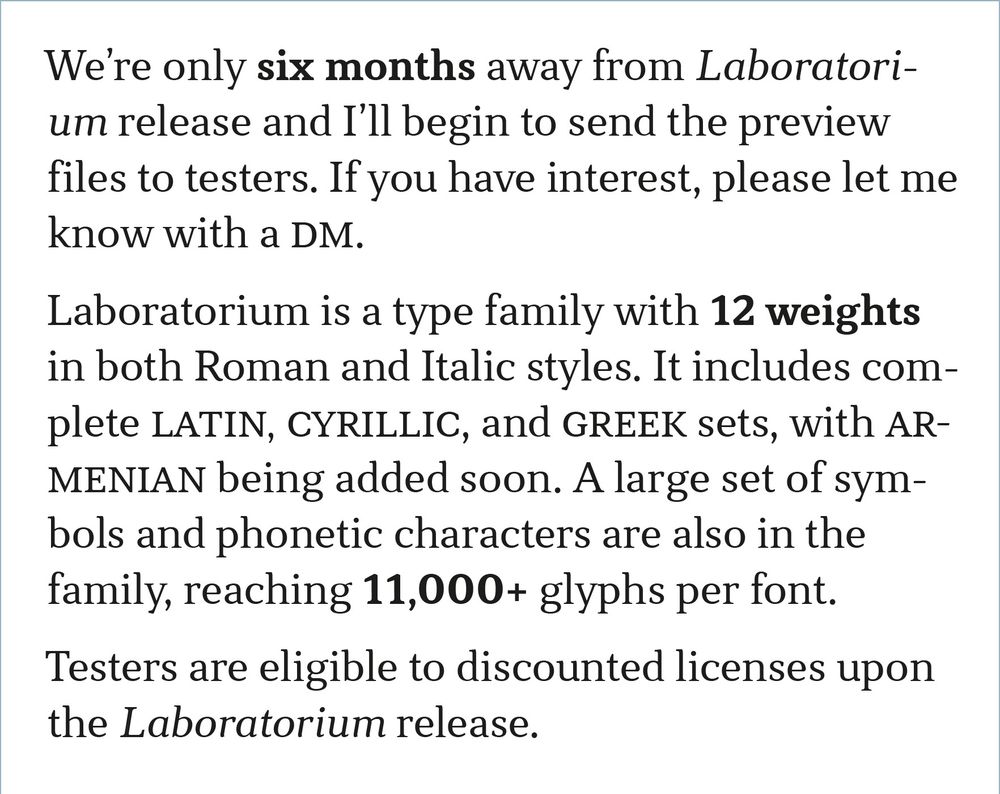
Laboratorium: Call for Testers
#font #typography #serif #ligatures #cyrillic #latin #greek #armenian #fontlab #typeface
#font #typography #serif #ligatures #cyrillic #latin #greek #armenian #fontlab #typeface
August 5, 2025 at 10:47 PM
Laboratorium: Call for Testers
#font #typography #serif #ligatures #cyrillic #latin #greek #armenian #fontlab #typeface
#font #typography #serif #ligatures #cyrillic #latin #greek #armenian #fontlab #typeface
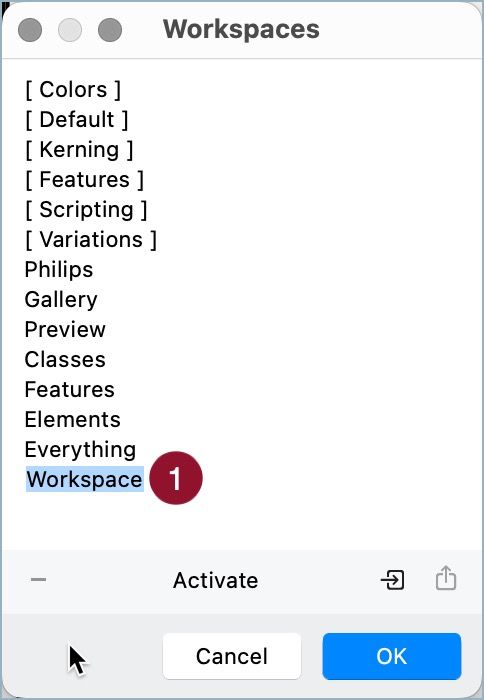
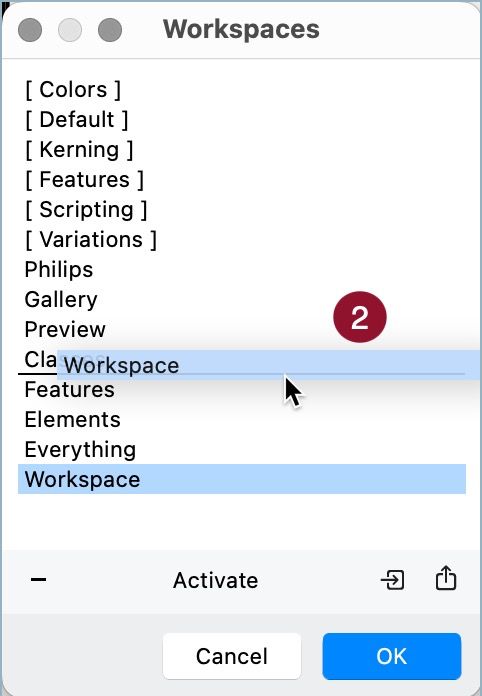
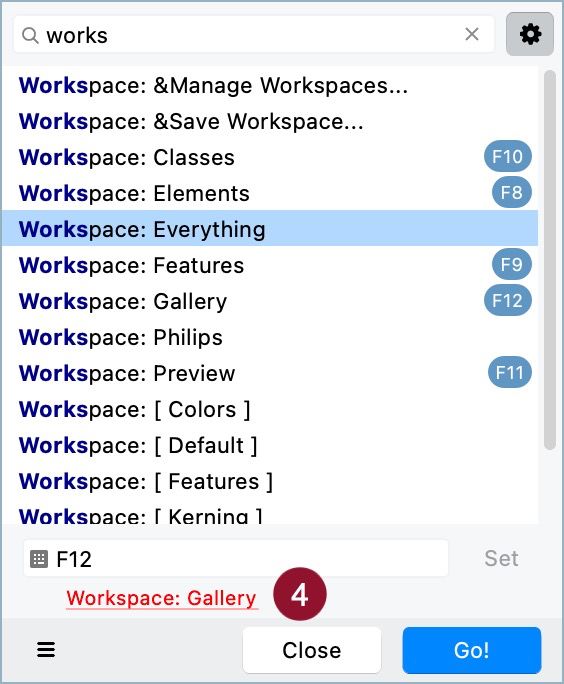
FontLab 8 Tip: Workspaces
After you arranged your FontLab interface, save it as a Workspace in Windows > Workspaces > Save Workspaces. Double-click its default name to rename (1). Drag its name to reorder the menu (2), import (3) and export (4) a Workspace with these buttons.
After you arranged your FontLab interface, save it as a Workspace in Windows > Workspaces > Save Workspaces. Double-click its default name to rename (1). Drag its name to reorder the menu (2), import (3) and export (4) a Workspace with these buttons.

August 5, 2025 at 9:39 PM
FontLab 8 Tip: Workspaces
After you arranged your FontLab interface, save it as a Workspace in Windows > Workspaces > Save Workspaces. Double-click its default name to rename (1). Drag its name to reorder the menu (2), import (3) and export (4) a Workspace with these buttons.
After you arranged your FontLab interface, save it as a Workspace in Windows > Workspaces > Save Workspaces. Double-click its default name to rename (1). Drag its name to reorder the menu (2), import (3) and export (4) a Workspace with these buttons.
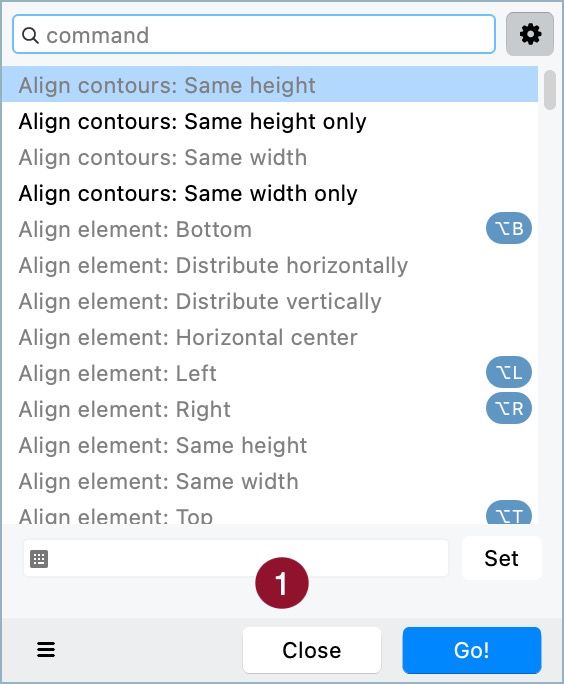
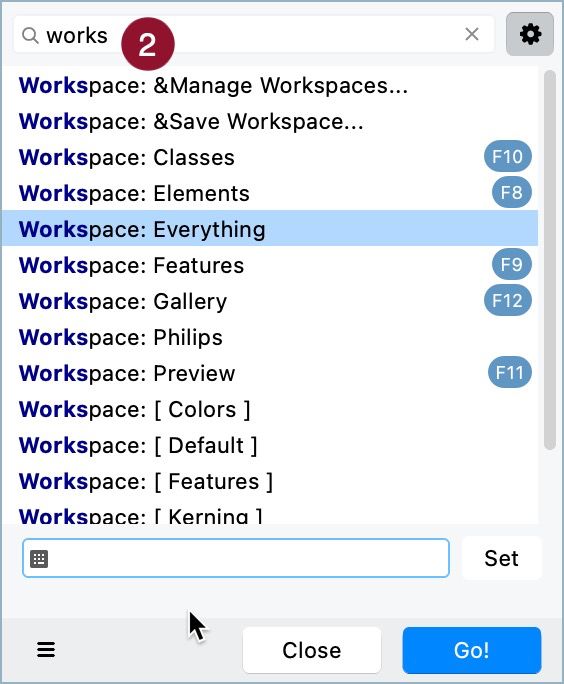
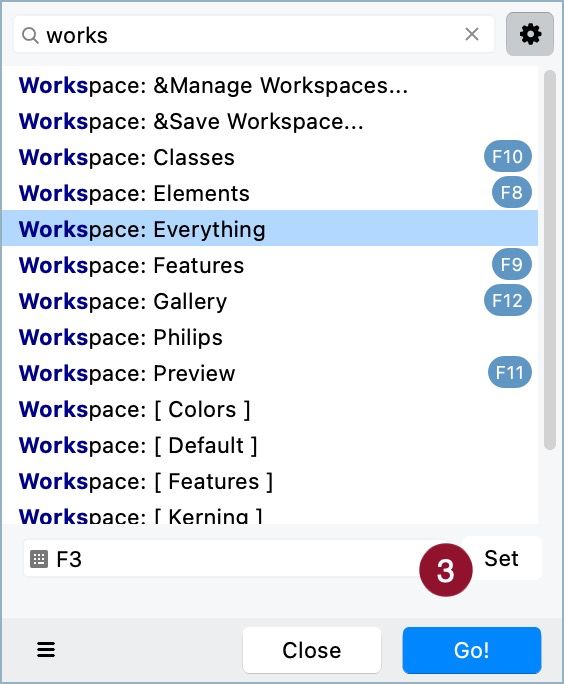
FontLab 8 Tip: Custom Shortcuts
Customize shortcuts in Tools > Commands and Shortcuts. All commands from menus are available (1). Use this field to find a command (2), type the shortcut and set it (3). In use shortcuts can't be set, click the red alert to remove them first (4).
Customize shortcuts in Tools > Commands and Shortcuts. All commands from menus are available (1). Use this field to find a command (2), type the shortcut and set it (3). In use shortcuts can't be set, click the red alert to remove them first (4).
August 5, 2025 at 9:26 PM
FontLab 8 Tip: Custom Shortcuts
Customize shortcuts in Tools > Commands and Shortcuts. All commands from menus are available (1). Use this field to find a command (2), type the shortcut and set it (3). In use shortcuts can't be set, click the red alert to remove them first (4).
Customize shortcuts in Tools > Commands and Shortcuts. All commands from menus are available (1). Use this field to find a command (2), type the shortcut and set it (3). In use shortcuts can't be set, click the red alert to remove them first (4).
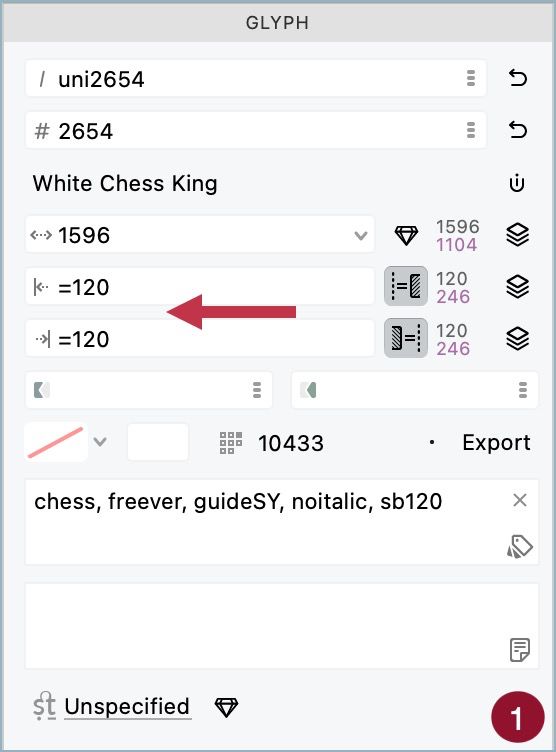
FontLab 8 Tip: Sidebearing Secrets
In Glyph panel, you can set the values for left and right sidebearings. But you're not limited to integers.
Add a = before the value to lock it –so changes in contours will not affect the sidebearing (1).
In Glyph panel, you can set the values for left and right sidebearings. But you're not limited to integers.
Add a = before the value to lock it –so changes in contours will not affect the sidebearing (1).
August 3, 2025 at 10:45 AM
FontLab 8 Tip: Sidebearing Secrets
In Glyph panel, you can set the values for left and right sidebearings. But you're not limited to integers.
Add a = before the value to lock it –so changes in contours will not affect the sidebearing (1).
In Glyph panel, you can set the values for left and right sidebearings. But you're not limited to integers.
Add a = before the value to lock it –so changes in contours will not affect the sidebearing (1).
FontLab 8 Tip: Nonspacing Elements
In the Elements panel there is a column to assign the nonspacing attribute (1). Elements marked with it are not considered in sidebearings or glyph width. But why this option does exist? +
In the Elements panel there is a column to assign the nonspacing attribute (1). Elements marked with it are not considered in sidebearings or glyph width. But why this option does exist? +

August 2, 2025 at 10:05 AM
FontLab 8 Tip: Nonspacing Elements
In the Elements panel there is a column to assign the nonspacing attribute (1). Elements marked with it are not considered in sidebearings or glyph width. But why this option does exist? +
In the Elements panel there is a column to assign the nonspacing attribute (1). Elements marked with it are not considered in sidebearings or glyph width. But why this option does exist? +
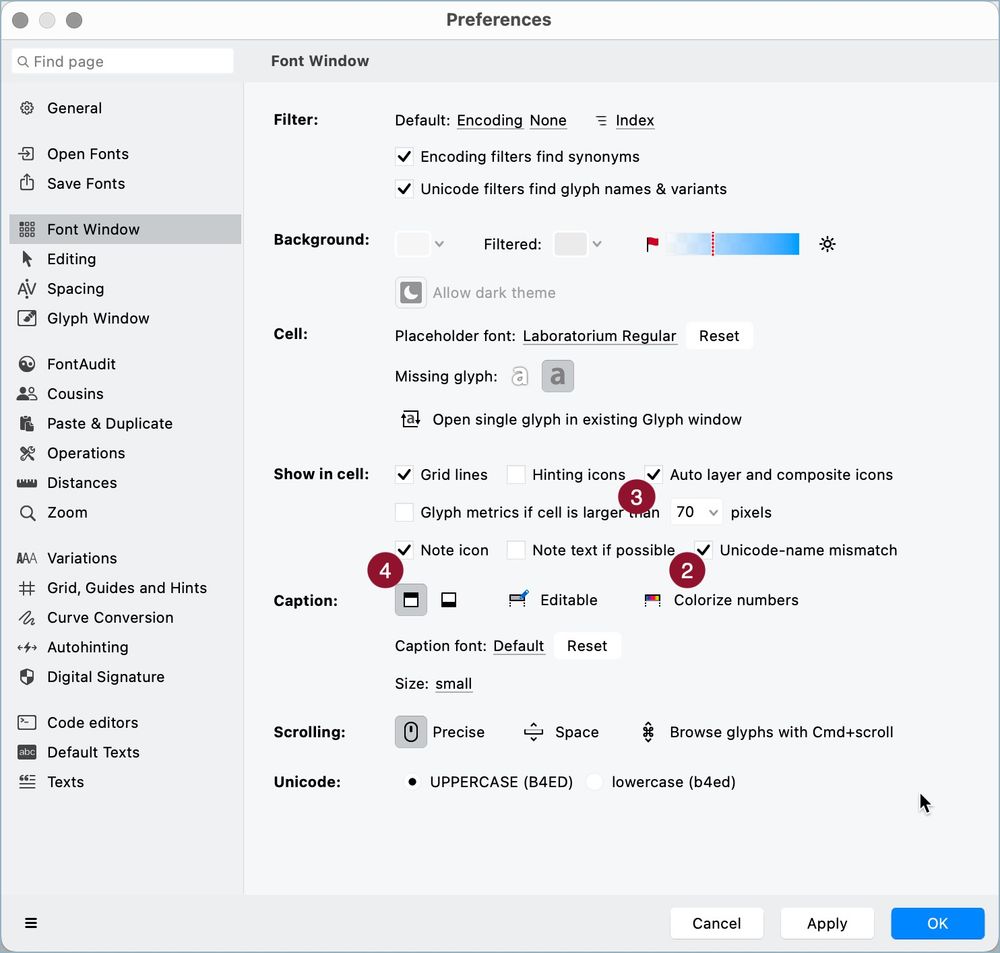
FontLab 8 Tip: Indicators in Font Window II
Indicators 2, 3, and 4 can be turned on/off in Preferences > Font Window. But the indicator for modified glyphs since the last save operation is always shown.
Indicators 2, 3, and 4 can be turned on/off in Preferences > Font Window. But the indicator for modified glyphs since the last save operation is always shown.
August 1, 2025 at 8:46 AM
FontLab 8 Tip: Indicators in Font Window II
Indicators 2, 3, and 4 can be turned on/off in Preferences > Font Window. But the indicator for modified glyphs since the last save operation is always shown.
Indicators 2, 3, and 4 can be turned on/off in Preferences > Font Window. But the indicator for modified glyphs since the last save operation is always shown.
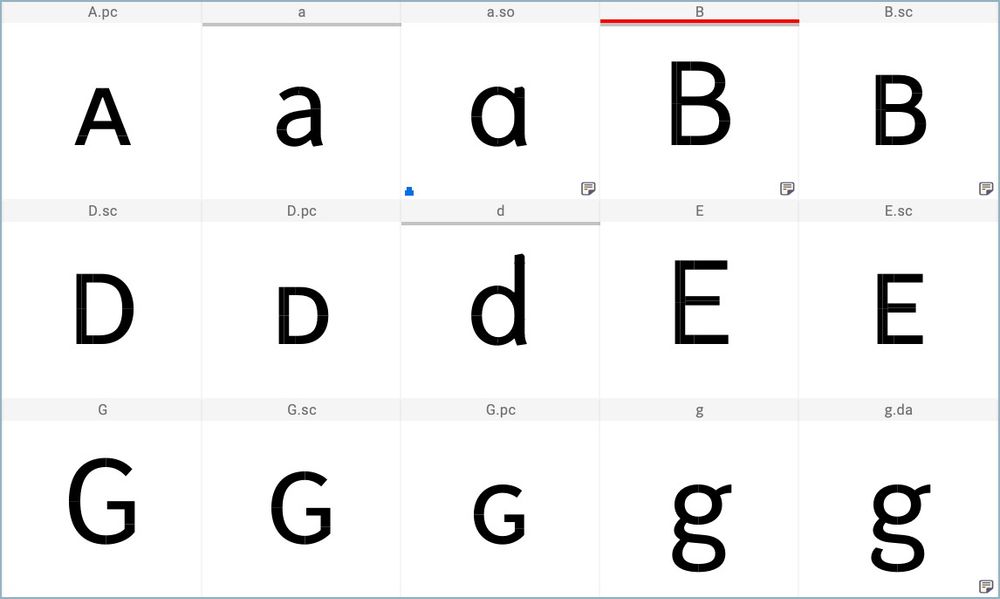
FontLab 8 Tip: Indicators in Font Window I
Font Window shows: a gray line (1) when the glyph was modified; a red line (2) when there is an error with glyph name or Unicode code; a blue icon (3) when the glyph is an auto layer; and a note icon when it has a note (4).
Font Window shows: a gray line (1) when the glyph was modified; a red line (2) when there is an error with glyph name or Unicode code; a blue icon (3) when the glyph is an auto layer; and a note icon when it has a note (4).
August 1, 2025 at 8:39 AM
FontLab 8 Tip: Indicators in Font Window I
Font Window shows: a gray line (1) when the glyph was modified; a red line (2) when there is an error with glyph name or Unicode code; a blue icon (3) when the glyph is an auto layer; and a note icon when it has a note (4).
Font Window shows: a gray line (1) when the glyph was modified; a red line (2) when there is an error with glyph name or Unicode code; a blue icon (3) when the glyph is an auto layer; and a note icon when it has a note (4).
FontLab 8 Tip: Preview in Glyph Window
While working in Glyph Window (1), at any moment you can preview the result simply holding the Space key (2). You also can use View > True View (or Shift + Space) to make the filled areas always visible (3).
While working in Glyph Window (1), at any moment you can preview the result simply holding the Space key (2). You also can use View > True View (or Shift + Space) to make the filled areas always visible (3).

August 1, 2025 at 8:27 AM
FontLab 8 Tip: Preview in Glyph Window
While working in Glyph Window (1), at any moment you can preview the result simply holding the Space key (2). You also can use View > True View (or Shift + Space) to make the filled areas always visible (3).
While working in Glyph Window (1), at any moment you can preview the result simply holding the Space key (2). You also can use View > True View (or Shift + Space) to make the filled areas always visible (3).
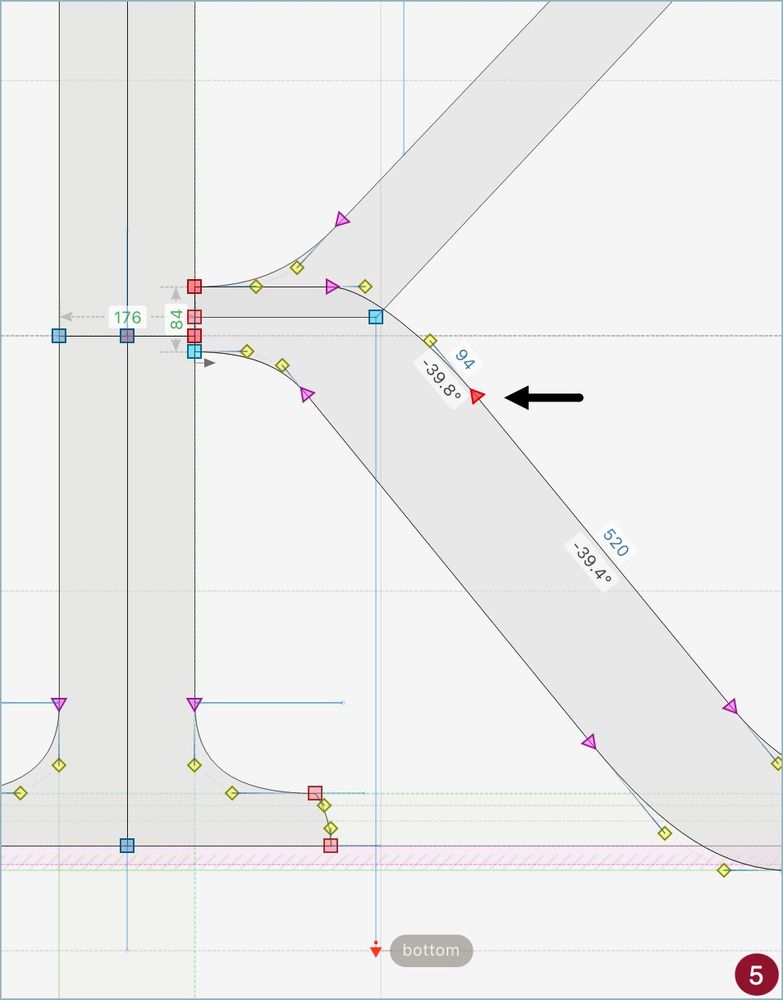
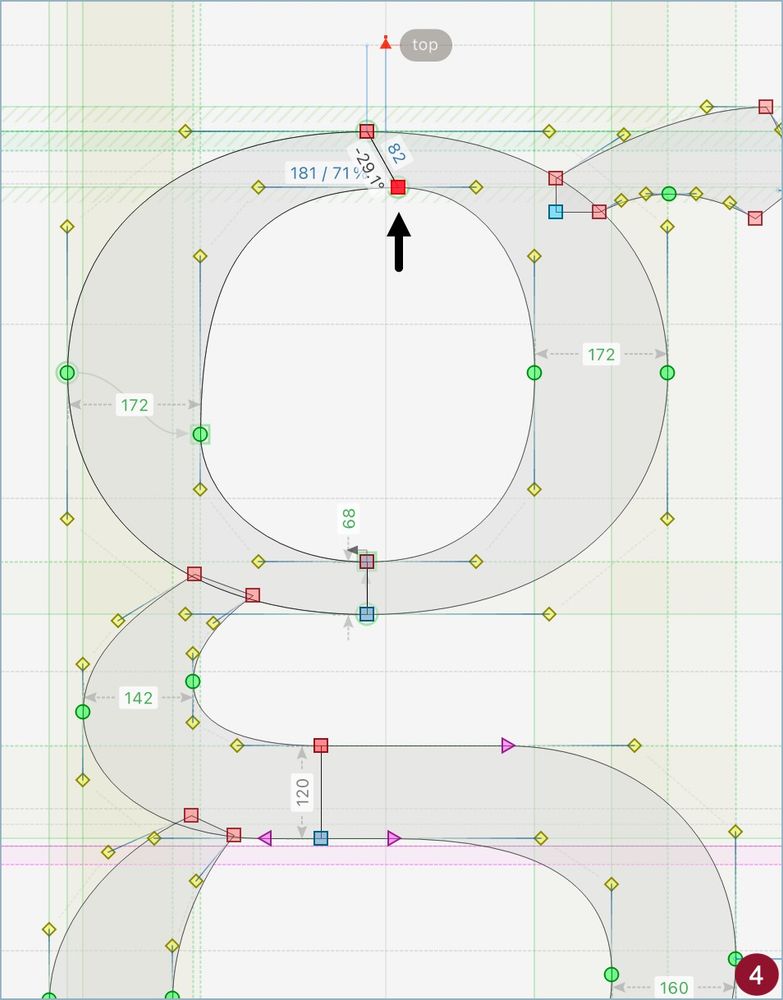
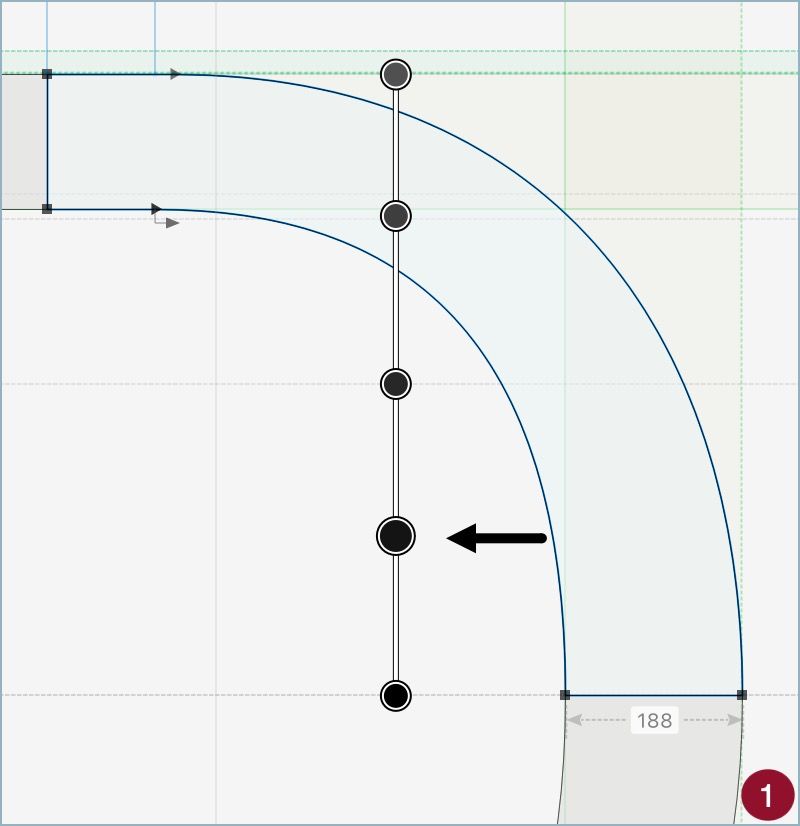
FontLab 8 Tip: Sliding Nodes in Diagonals
Select a node in a diagonal segment (1). Hold the Alt/Option key and move it. The node slides along the diagonal, which angle does not change (2). If the node is a tangent, the handle position is also preserved.
Select a node in a diagonal segment (1). Hold the Alt/Option key and move it. The node slides along the diagonal, which angle does not change (2). If the node is a tangent, the handle position is also preserved.
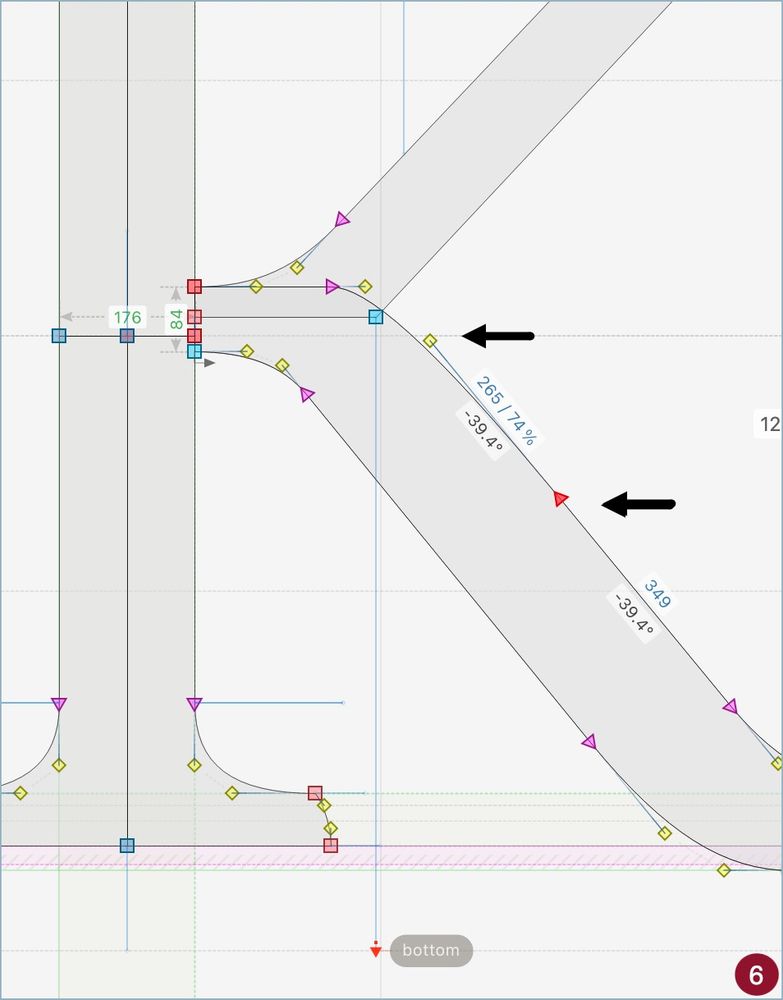
August 1, 2025 at 8:08 AM
FontLab 8 Tip: Sliding Nodes in Diagonals
Select a node in a diagonal segment (1). Hold the Alt/Option key and move it. The node slides along the diagonal, which angle does not change (2). If the node is a tangent, the handle position is also preserved.
Select a node in a diagonal segment (1). Hold the Alt/Option key and move it. The node slides along the diagonal, which angle does not change (2). If the node is a tangent, the handle position is also preserved.
FontLab 8 Tip: Moving Nodes But Not Handles
Select a node with handles (1), hold Alt/Option key, and move it. The handles are not moved (2). This works with any kind of node (3) and also with multiple nodes at once (4). Multiplier keys (Shift and Ctrl) can be used together.
Select a node with handles (1), hold Alt/Option key, and move it. The handles are not moved (2). This works with any kind of node (3) and also with multiple nodes at once (4). Multiplier keys (Shift and Ctrl) can be used together.
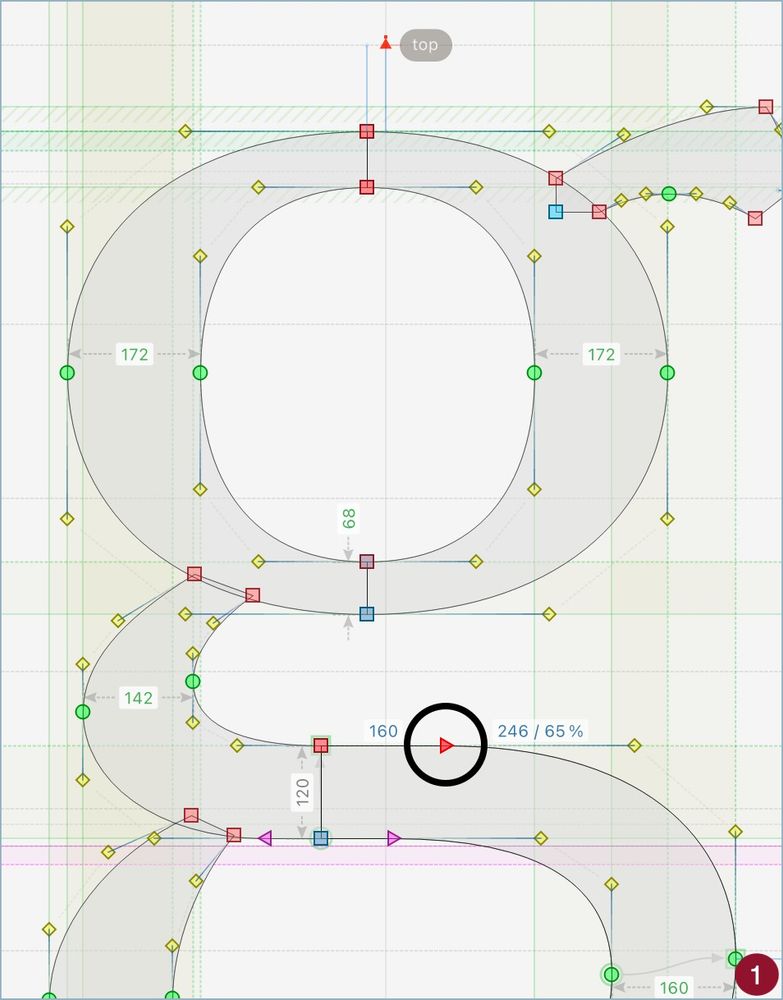
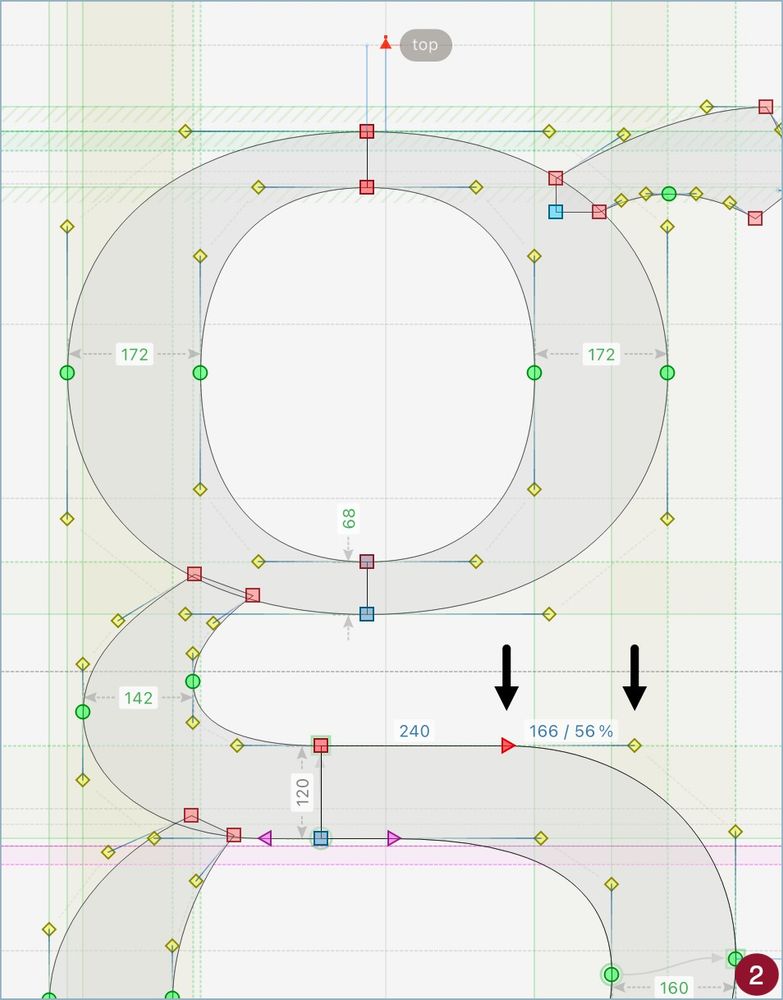
August 1, 2025 at 8:02 AM
FontLab 8 Tip: Moving Nodes But Not Handles
Select a node with handles (1), hold Alt/Option key, and move it. The handles are not moved (2). This works with any kind of node (3) and also with multiple nodes at once (4). Multiplier keys (Shift and Ctrl) can be used together.
Select a node with handles (1), hold Alt/Option key, and move it. The handles are not moved (2). This works with any kind of node (3) and also with multiple nodes at once (4). Multiplier keys (Shift and Ctrl) can be used together.
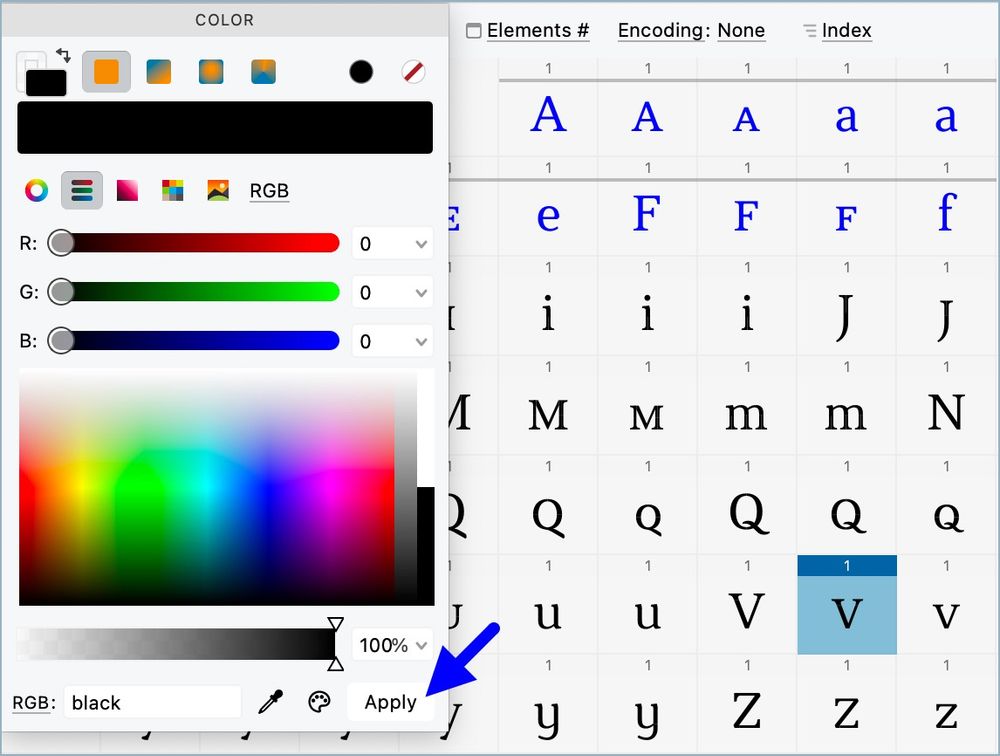
FontLab 8 Tip: Coloring Many Glyphs at Once
1. Select the glyphs in Font Window. 2. Go to Glyph > Flatten Layer. 3. Open the Color panel. 4. Choose and Apply any color. Done. Why flatten? Since color is an element attribute, you need a single element in each glyph to do this.
1. Select the glyphs in Font Window. 2. Go to Glyph > Flatten Layer. 3. Open the Color panel. 4. Choose and Apply any color. Done. Why flatten? Since color is an element attribute, you need a single element in each glyph to do this.
July 28, 2025 at 10:24 AM
FontLab 8 Tip: Coloring Many Glyphs at Once
1. Select the glyphs in Font Window. 2. Go to Glyph > Flatten Layer. 3. Open the Color panel. 4. Choose and Apply any color. Done. Why flatten? Since color is an element attribute, you need a single element in each glyph to do this.
1. Select the glyphs in Font Window. 2. Go to Glyph > Flatten Layer. 3. Open the Color panel. 4. Choose and Apply any color. Done. Why flatten? Since color is an element attribute, you need a single element in each glyph to do this.
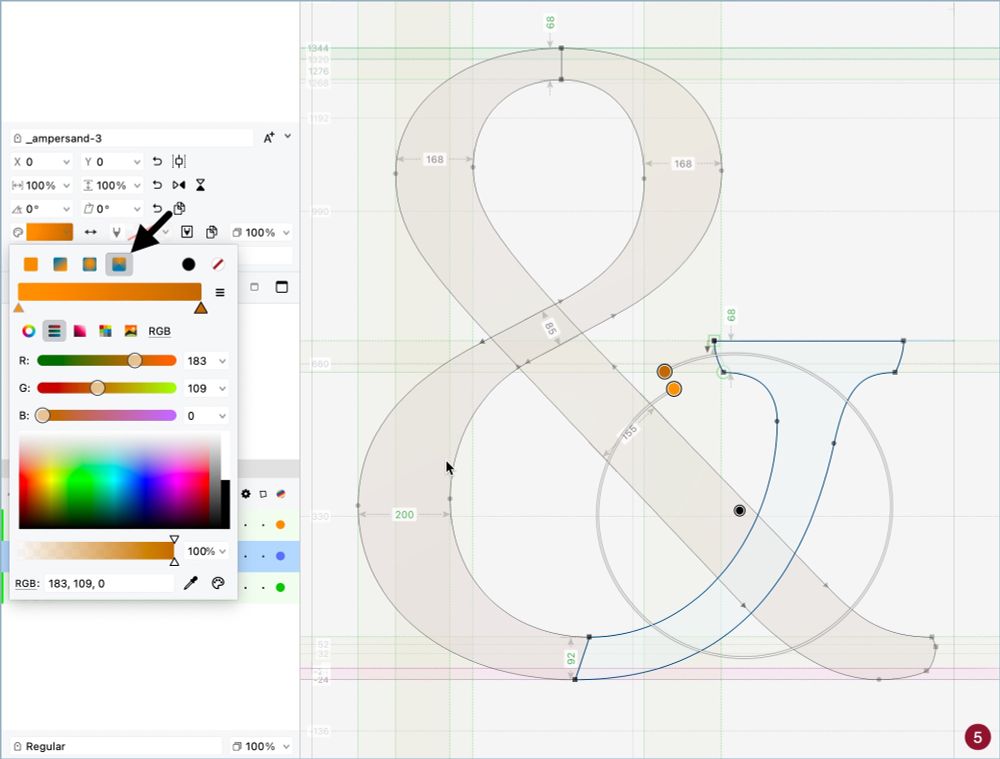
FontLab 8 Tips: Adding Gradients III
Besides the liner gradient, FontLab offers the radial (4) and the conical gradients (5). Both are fully editable using the controls from Elements panel. A sample of all gradients can be seen in (6).
Besides the liner gradient, FontLab offers the radial (4) and the conical gradients (5). Both are fully editable using the controls from Elements panel. A sample of all gradients can be seen in (6).

July 28, 2025 at 10:15 AM
FontLab 8 Tips: Adding Gradients III
Besides the liner gradient, FontLab offers the radial (4) and the conical gradients (5). Both are fully editable using the controls from Elements panel. A sample of all gradients can be seen in (6).
Besides the liner gradient, FontLab offers the radial (4) and the conical gradients (5). Both are fully editable using the controls from Elements panel. A sample of all gradients can be seen in (6).
FontLab 8 Tip: Adding Gradients II
You can add more colors to the gradient with a double click in the gradient control ❶ or in the ribbon from the color options in Elements panel ❷.
You can add more colors to the gradient with a double click in the gradient control ❶ or in the ribbon from the color options in Elements panel ❷.
July 14, 2025 at 8:27 AM
FontLab 8 Tip: Adding Gradients II
You can add more colors to the gradient with a double click in the gradient control ❶ or in the ribbon from the color options in Elements panel ❷.
You can add more colors to the gradient with a double click in the gradient control ❶ or in the ribbon from the color options in Elements panel ❷.
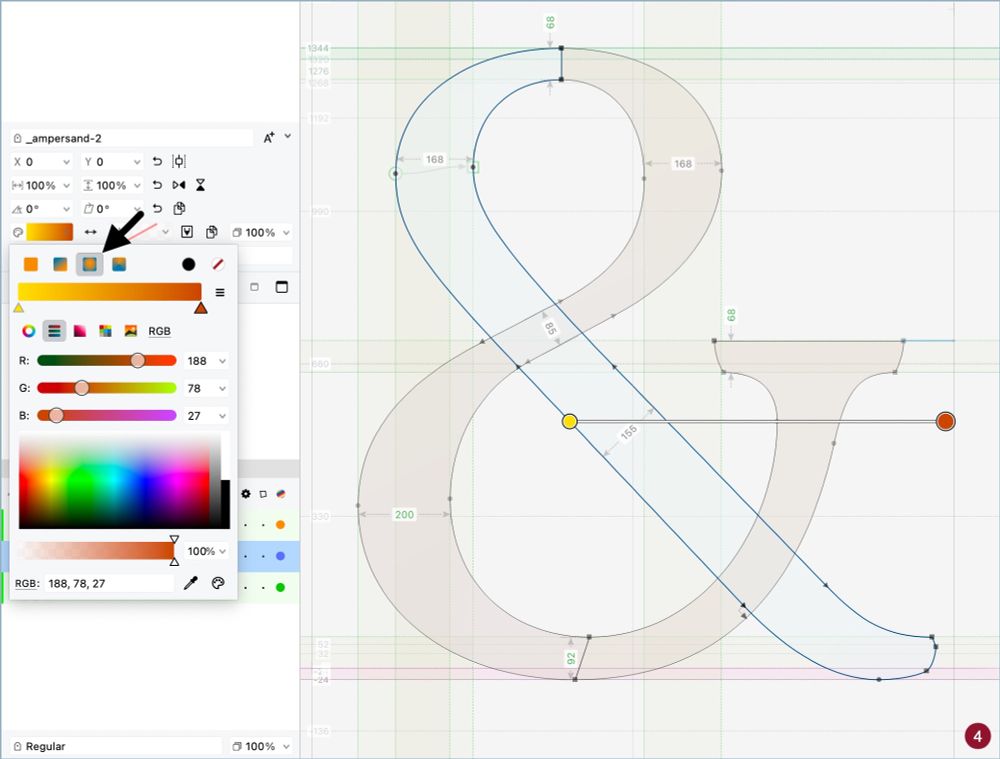
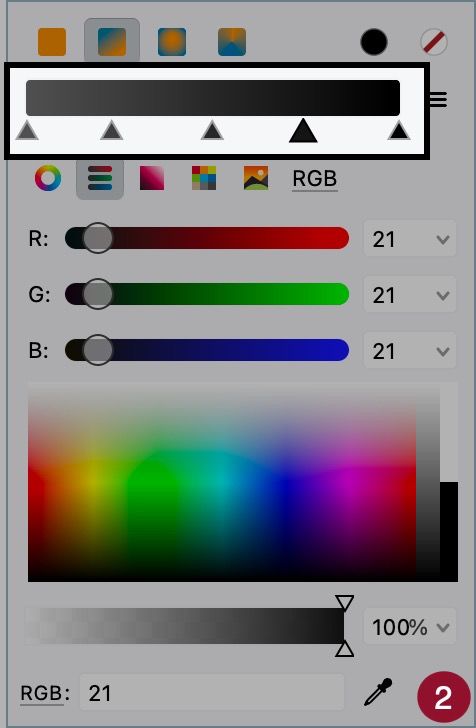
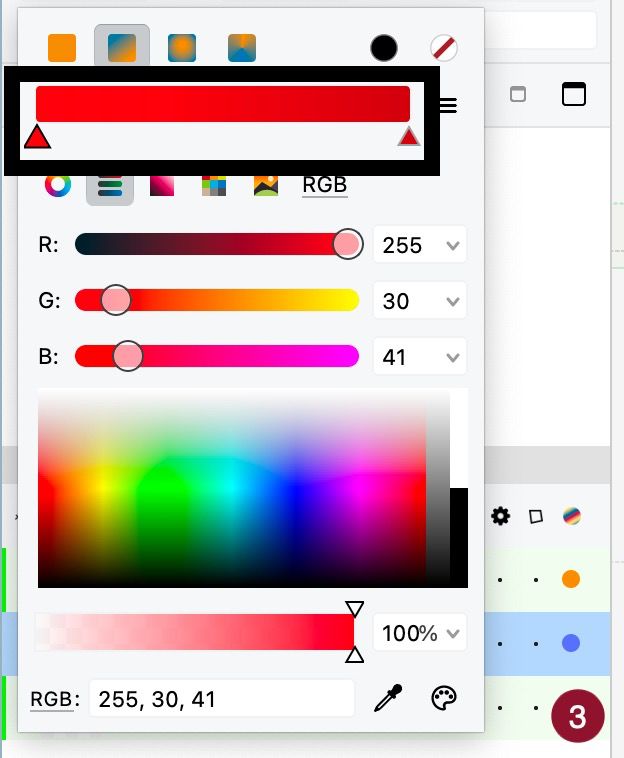
FontLab 8 Tip: Adding Gradients I
In the Elements panel, click in the color button and select one kind of gradient ❶. Select the initial colors to change them in the gradient control ❷. Slide the triangles to change how the gradient is built ❸.
In the Elements panel, click in the color button and select one kind of gradient ❶. Select the initial colors to change them in the gradient control ❷. Slide the triangles to change how the gradient is built ❸.
July 14, 2025 at 8:12 AM
FontLab 8 Tip: Adding Gradients I
In the Elements panel, click in the color button and select one kind of gradient ❶. Select the initial colors to change them in the gradient control ❷. Slide the triangles to change how the gradient is built ❸.
In the Elements panel, click in the color button and select one kind of gradient ❶. Select the initial colors to change them in the gradient control ❷. Slide the triangles to change how the gradient is built ❸.
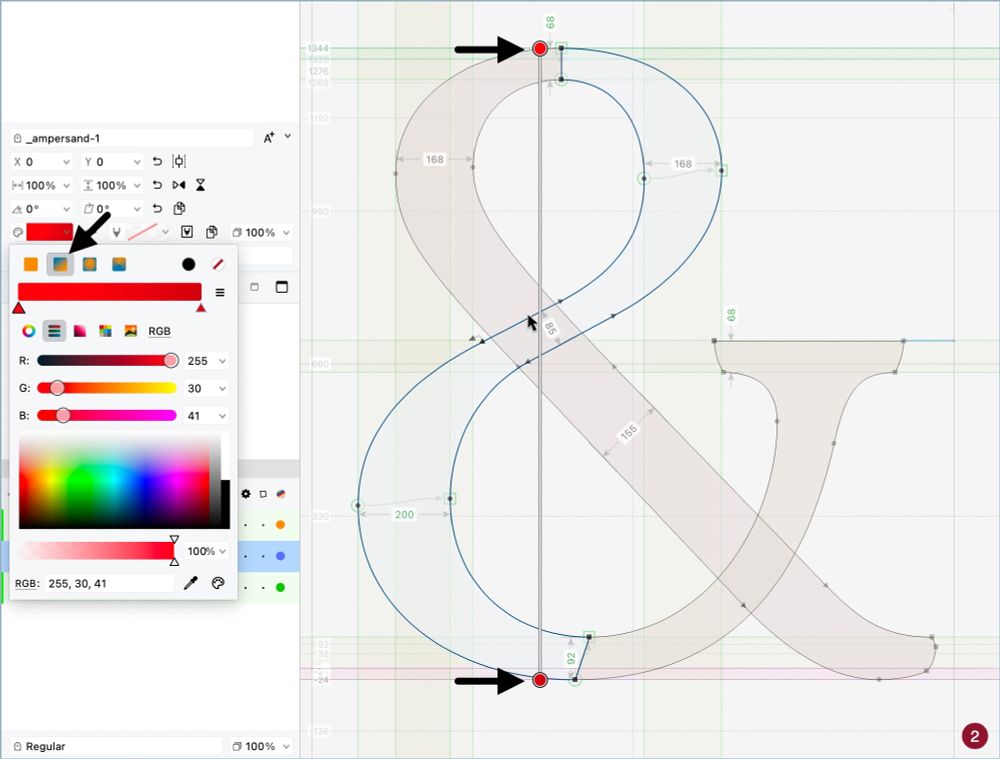
FontLab 8 Tip: Adding Colors II
In the normal editing mode, the Glyph Window show the element colors with a very light tint to avoid visual pollution ❸. Don't worry, the colors are there. Just hold the Space key to preview the glyph ❹.
In the normal editing mode, the Glyph Window show the element colors with a very light tint to avoid visual pollution ❸. Don't worry, the colors are there. Just hold the Space key to preview the glyph ❹.

July 11, 2025 at 8:41 AM
FontLab 8 Tip: Adding Colors II
In the normal editing mode, the Glyph Window show the element colors with a very light tint to avoid visual pollution ❸. Don't worry, the colors are there. Just hold the Space key to preview the glyph ❹.
In the normal editing mode, the Glyph Window show the element colors with a very light tint to avoid visual pollution ❸. Don't worry, the colors are there. Just hold the Space key to preview the glyph ❹.
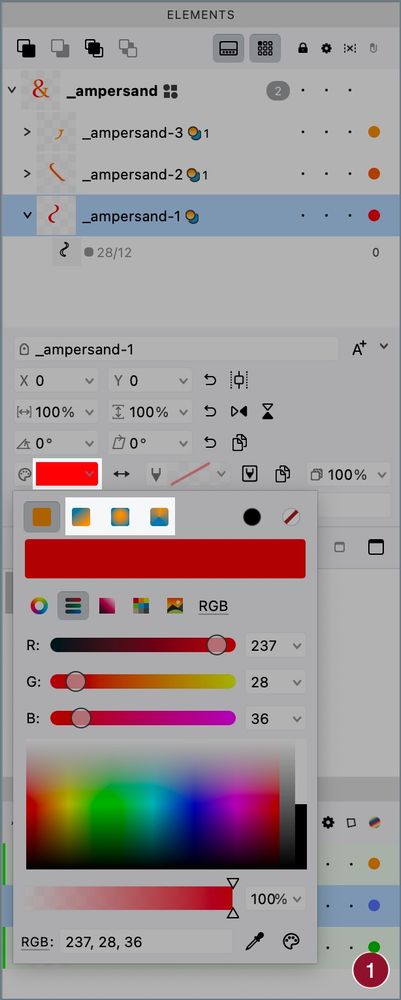
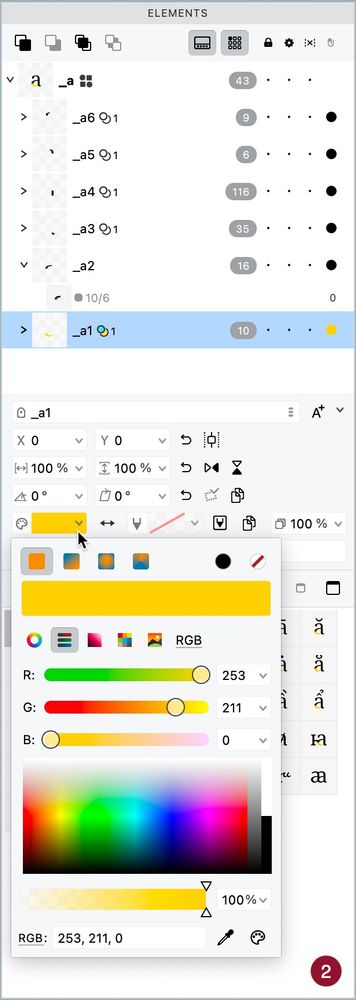
FontLab 8 Tip: Adding Colors I
Colors are applied to elements. Just select the element in the Elements panel and open the color table using the dot at right ❶. You can also use the properties area, where there is more options, including color stroke ❷.
Colors are applied to elements. Just select the element in the Elements panel and open the color table using the dot at right ❶. You can also use the properties area, where there is more options, including color stroke ❷.
July 11, 2025 at 8:33 AM
FontLab 8 Tip: Adding Colors I
Colors are applied to elements. Just select the element in the Elements panel and open the color table using the dot at right ❶. You can also use the properties area, where there is more options, including color stroke ❷.
Colors are applied to elements. Just select the element in the Elements panel and open the color table using the dot at right ❶. You can also use the properties area, where there is more options, including color stroke ❷.
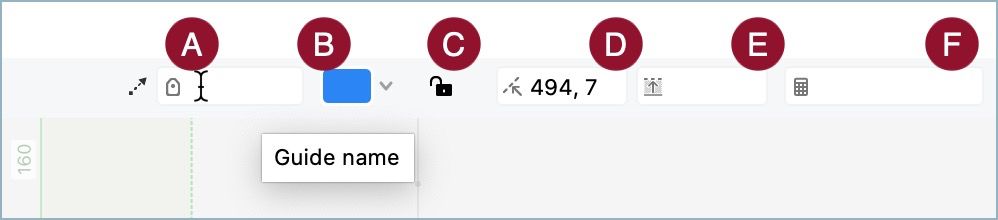
FontLab 8 Tip: Element Guides II
Just like Font and Glyph guides, an Element guide can receive a name (A), a custom color (B), be locked (C), get is position numerically defined (D), a thickness (E) and an expression using values and parameters, like "ascender/2".
Just like Font and Glyph guides, an Element guide can receive a name (A), a custom color (B), be locked (C), get is position numerically defined (D), a thickness (E) and an expression using values and parameters, like "ascender/2".
July 10, 2025 at 12:07 AM
FontLab 8 Tip: Element Guides II
Just like Font and Glyph guides, an Element guide can receive a name (A), a custom color (B), be locked (C), get is position numerically defined (D), a thickness (E) and an expression using values and parameters, like "ascender/2".
Just like Font and Glyph guides, an Element guide can receive a name (A), a custom color (B), be locked (C), get is position numerically defined (D), a thickness (E) and an expression using values and parameters, like "ascender/2".
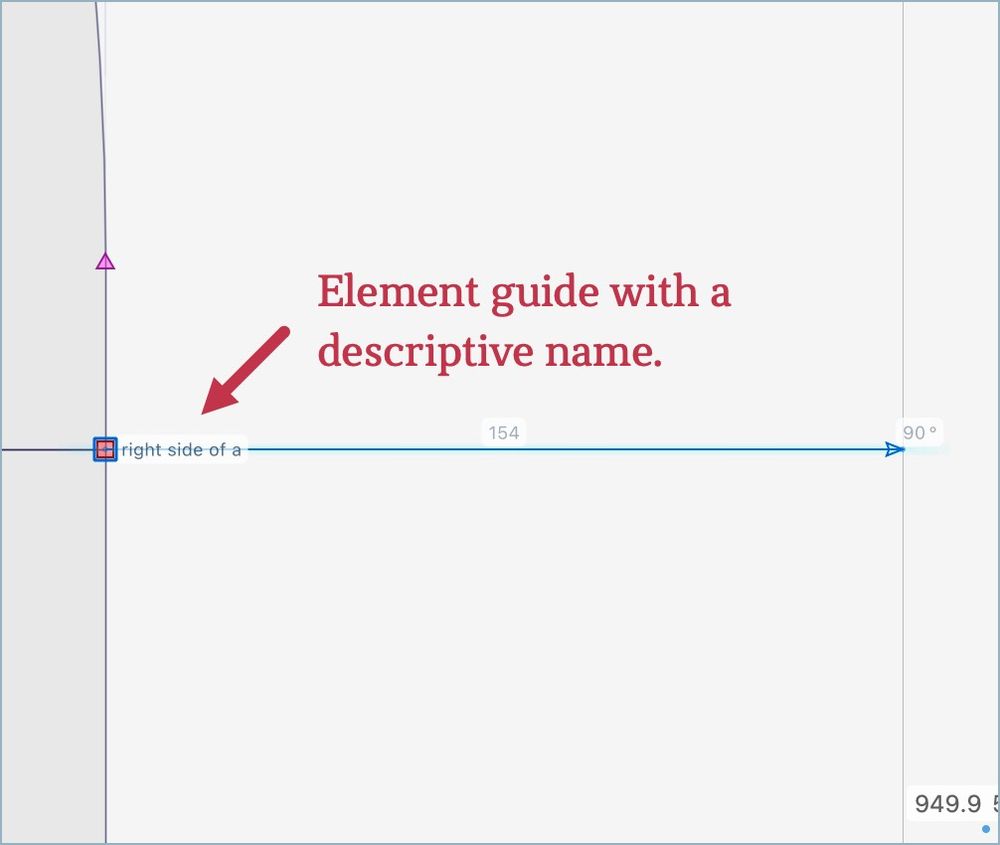
FontLab 8 Tip: Element Guides I
Element guides belong to the element active when it was created and can be linked to nodes. To create it, choose the Guides tool (G), hold Alt and drag. These guides are good to mark sidebearings (A), anchor positions (B) or geometric middles (C).
Element guides belong to the element active when it was created and can be linked to nodes. To create it, choose the Guides tool (G), hold Alt and drag. These guides are good to mark sidebearings (A), anchor positions (B) or geometric middles (C).
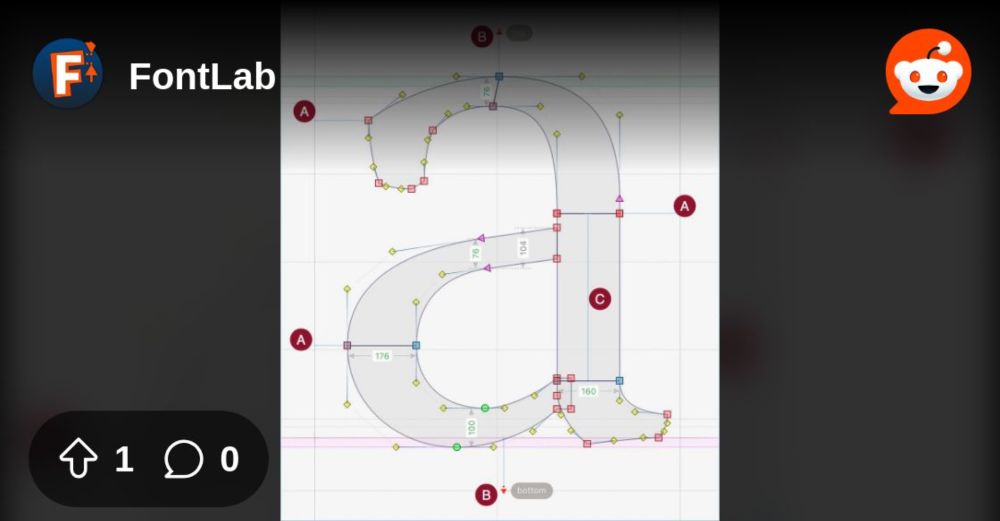
From the FontLab community on Reddit: FontLab 8 Tip: Element Guides I
Explore this post and more from the FontLab community
www.reddit.com
July 9, 2025 at 11:55 PM
FontLab 8 Tip: Element Guides I
Element guides belong to the element active when it was created and can be linked to nodes. To create it, choose the Guides tool (G), hold Alt and drag. These guides are good to mark sidebearings (A), anchor positions (B) or geometric middles (C).
Element guides belong to the element active when it was created and can be linked to nodes. To create it, choose the Guides tool (G), hold Alt and drag. These guides are good to mark sidebearings (A), anchor positions (B) or geometric middles (C).