Florisium
banner
florisium.bsky.social
Florisium
@florisium.bsky.social
18 followers 7 following 33 posts
Your calm escape into a uniquely blooming world Join our community: https://discord.gg/DPvkZhwhnN
Posts Media Videos Starter Packs
Pinned

Florisium is a peaceful mobile sandbox game where every flower is meticulously simulated, ensuring no two are ever the same

#flowers #mobilegame #sandbox #cozygame #gamedev
btw - check HDR version of these images on Threads - completely different atmosphere!

www.threads.com/@florisium.g...
Sunlight meets color, and I’m hooked. Proof that subsurface scattering deserves more hype.

#flowers #mobilegame #cozygame #flowerlovers #homeplant #sandbox #simulationgames #subsurfacescattering
Sometimes, the best things grow when you stop trying to control them. This tangled beast I grew up last week, thinkscreenshotsaturday is the best time to share it.

#screenshotsaturday #flowers #mobilegame #cozygame #flowerlovers #homeplant #sandbox #simulationgames #bee #honeybee
I have forwards and mobile - not too many moves allowed 😅 So its a simple multiply-blending that runs after all geometry. For the lights, its a bit hackier - I don't have proper albedo at the pass, instead, I multiply with the back buffer and add the same value on top, very wrong but works for me 😜
There are, of course, plenty of limitations (obvious and not-so-obvious) - I’ll dive into those next time 😉

And finally, here are a few fresh in-game shots (and remember - the game is still about flowers! 🌸)

(16/16)
Bonus point: the same approach also gives cheap multi-point (and areal) lights support - in forward rendering, on mobile! 🎉🎉🎉

(15/16)
Performance-wise, it’s similar to the previous method, but no texture fetches, all math is half-based, and only ~30–40 instructions per shape type.
On an iPhone 15Pro, native res, it costs about 0.02–0.2ms, depending on scene complexity and density (all are combined to a single draw-call).
(14/16)
Using this system, I built a small set (7 types) of analytical AO shapes that cover most in-game dynamic props.
The result is much more detailed and believable than the old texture-based version.

Left = old. Right = new.

(13/16)
Side views of cylindrical shapes also needed separate math (and again, the right image shows the ray-traced reference).

(12/16)
Rectangular shapes are trickier since they have hard edges.
I ended up with a slightly different, yet still cheap, function that models the visibility per rectangle size - same logic as with cylinders.

(11/16)
For a top-down projected cylinder, that relation is proportional to arctan(D/R), where R is the cylinder radius.
This separation (vertical+horizontal) produces results that are visually close to ray-traced truth - see the right image (distances and heights are not correlated on the images):
(10/16)
The vertical part comes from the formula I showed earlier - nice and straightforward.

The horizontal part, though, depends on how visibility changes with the distance to the surface and the surface’s own size.
The 2D version is a good start - but it doesn’t capture the whole. We need one more dimension to handle, which makes things trickier.
Ideally, this should be a hemispherical integral of point visibility.
In practice, I simplified it by splitting it into vertical and horizontal 2D components.
(9/16)
Luckily, this simplifies nicely since cos(arctan(x)) = x/sqrt(x²+1).
That gives a lightweight, computation-friendly formula that still behaves like smooth, realistic occlusion.
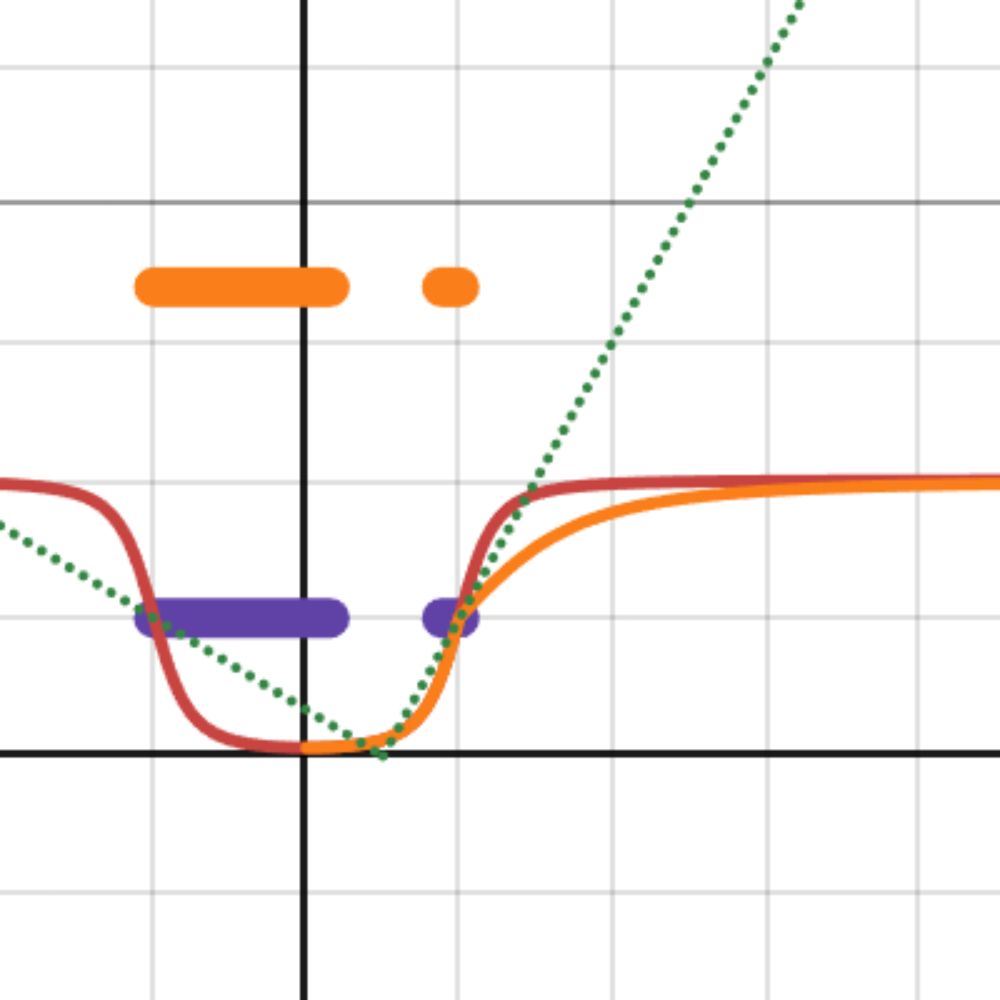
You can play with the simplified version here: www.desmos.com/calculator/j...
(8/16)
occlusion-simplified
www.desmos.com
The core 2D case is actually simple:
Imagine a flat occluder of width 2W(from -W to W) standing at height H.
The occlusion function looks like:
(cos(arctan((x - W)/H)) + cos(arctan((-x - W)/H))) / 2 + 1
In other words - the sum of light coming from the left and right gaps around the occluder.
(7/16)
So I finally found the courage to revisit the technique.
This time - no prebaked textures.
Instead, I went analytical - doing the math to emulate occlusion shapes directly for some simple primitives (boxes, spheres, cylinders, cones, etc).

(6/16)
Results were way better than no AO at all, and every earlier game shot you’ve seen used this method.

But... it was never perfect. Fixed textures have obvious limits.

(5/16)
For the first version of the system, I used static textures to approximate the occlusion shape of some typical primitives.

Just 3 texture types - pulled on for every moving object in the game (could be more than 1 shape per object).
It worked!
4. Apply some shadow (occlusion) pattern on the area and draw the resulting geometry.

5. And yeah - do the above for every occlusion-receiver pair 😅

(4/16)
The base idea is beautifully simple:

1. Define surfaces that receive occlusion.

2. Define objects that cast occlusion.

3. For each receiver–caster pair, compute the projected occlusion area that roughly estimates shadowing of the cast object.
So, I went back in time and revived a classic: blob shadows - the technique used in early 3D games that often mimicked ambient occlusion rather than true shadows.

(3/16)
Since the game’s main platform is mobile, I needed a fast and robust AO solution for dynamic objects.
Screen-space AO? Not great for mobile-too noisy, not tile-based GPU friendly, inconsistent across devices, and needs heavy filtering.
Ray-traced AO? Same story-not (yet?) practical on mobile.
(2/16)
A bit technical thread 🧵

I’ve been improving the in-game ambient occlusion system - and ended up with something I call:
Blob-based Analytical Ambient Occlusion on Primitives

Here’s what it does to the final image:
(more examples later in the thread)

(1/16)